What is Omniverse
Omniverse is a platform and a series of technologies developed by NVIDIA around the USD standard (although they’re rapidly evolving in other directions as well).
Understanding the USD format is key to understanding many features of Omniverse and unlock its full potential.
It is highly encouraged to learn more about OpenUSD in this dedicated book before proceeding on to studying Omniverse.
At a thousand feet overview, Omniverse can be defined as a vast customizable framework of technologies and applications to work with 3D graphics, collaborating on creating 3D assets and scenes, using AI to create stunning visual effects or improve the process of creating 3D contents, adding real-time and physically correct physics behaviors to 3D contents, rendering in a physically-correct way with ray tracing or path tracing in real-time, etc.
NVIDIA doesn’t impose any workflow or dictate how Omniverse tools and technologies should be used (they can be used to create photorealistic render images that you later use commercially, they can be used to let multiple 3D artists work on a 3D scene simultaneously without interfering with each other’s modifications, they can be used to ‘predict’ the mechanical ‘wear’ in a ‘digital twin’ 3D representation of a mechanical part in 3D with accurate physics after many simulation steps, they can be used to create a server-side web service which renders something complex and streams the result as a video back to the user’s browser, etc.).
Omniverse is meant to be customized according to your desires, therefore users are meant to write extensions (i.e. libraries written in Python, C++, both or in other languages as well) so that these can leverage NVIDIA’s best-in-breed technologies (e.g. RTX raytracers, PhysX, AI integrations, etc.) to do useful graphical work for them.
We will dive more into extensions later in this book.
Pricing and requirements
Two things newcomers usually care a lot about: pricing and requirements.
Omniverse requires a license, for which there are both free and commercial options: see Omniverse Licensing after registration.
More in detail (from the official discord):
Omniverse (we’re referring to SDK here, there are also cloud APIs which are governed by their own licensing and pricing terms) allows you to compose applications out of extensions as building blocks. Composer, View, IsaacSim are examples of multiple-specific-extensions-composed desktop applications.
IsaacSim is a free and unsupported reference application built on top of Omniverse (Composer and View are in the process of being no longer officially supported but can be used as reference applications as well for now).
Omniverse, with the IsaacSim reference application, has the following licensing options:
- A free development, testing and research license for an individual user without a limit on number of GPUs (via the NVIDIA developer program)
- A free annual EDU license (education and academic research only) per GPU without enterprise support
- A paid annual commercial license (Omniverse Enterprise) per GPU with enterprise support for Omniverse, for which NVIDIA also offers EDU pricing.
This basically means:
- If (EDU) builds an app and uses it internally for research/education, they can utilize the free EDU license.
- If you use IsaacSim to build an app that is then used internally for production, each GPU needs to be licensed. This would be commercial usage.
- If (non-EDU) wants to resell / distribute that application, non-EDU can either (1) embed and resell Omniverse Enterprise as part of the application or (2) require customers to have an OVE license for each GPU running that application.
So essentially a lot of the confusion comes from the fact IsaacSim is built on OV, and using OV is subject to the license terms NVIDIA provides it under, i.e. there is a dependency on it. The cases in which it would be free is with that edu license (without support), or the individual license. IsaacSim is being treated as a separate product but the licensing is still tied.
Nucleus Licensing will charge per instance/node, since it doesn’t actually required a GPU to be run. The number of people who can work on it is unlimited.
For any other question or clarification please read the final paragraph of this post and get in contact with NVIDIA sales for a special license tailored to your needs: omniverse-license-questions@nvidia.com will get you in touch with a developer relations manager that can work with you.
Regarding Omniverse requirements, each application that works on the Omniverse platform might have different system requirements. The suggested way to get up-to-date information is to browse the NVIDIA website for the app you’re specifically interested in, e.g. the USD Composer/Create page lists requirements like a RTX class card as minimum viable hardware.
Support, learning, official resources
Omniverse is vast and asking for help is often of paramount importance.
Official channels to learn more about Omniverse, post questions regarding its official applications and main extensions (e.g. related to omni.physx) and get in touch with the great NVIDIA Omniverse community (friendly and available, NVIDIA is doing its best to foster a good community) are the Omniverse discord server, the YouTube Omniverse channel, the developer blog articles and, for critical bugs/issues, the official Omniverse forum (less chatty, more support-y).
Any non-Omniverse related question should not be asked in the above channels but rather in the NVIDIA customer support forum.
Readers are highly encouraged to take advantage of these support resources as it’ll make their journey into the Omniverse ecosystem a lot easier and, if you’re developing connectors or extensions for your business, provide the technical support and expertise to accomplish your goals.
Omniverse Launcher
Your first taste of Omniverse begins with the NVIDIA official launcher. If you’re experimenting with Omniverse for the first time you can freely download and use Omniverse according to the agreements exposed in the previous section.
The Omniverse Launcher allows you to quickly and automatedly install publicly available Omniverse applications like USD Composer or USD Presenter. Just head to the Exchange tab and start the download on your local machine.

Head over in the Launcher’s Exchange and install the USD Composer Omniverse app.
One tip that could be useful in automation: when Omniverse launcher is enabled and running in background (either sent to the system tray or in the foreground), it sets up listening ports that a script could use to get information related to the installed Omniverse applications and other Omniverse related data
$ sudo lsof -i -n -P | grep omniverse | grep LISTEN
omniverse 52092            alex   94u  IPv4 412430      0t0  TCP 127.0.0.1:33480 (LISTEN)
omniverse 52092            alex   98u  IPv4 414060      0t0  TCP 127.0.0.1:34080 (LISTEN)
$ curl -s http://127.0.0.1:33480/components # Perform a simple GET request
# ... lots of json here including installed apps on the local filesystem ....
[{"links":[{"title":"Release Notes","url":"https://docs.omniverse.nvidia.com/prod_nucleus/...
"install":{"path":"/home/alex/.local/share/ov/pkg/create-2023.3.0-beta/pull_kit_sdk.sh",
"root":"/home/alex/.local/share/ov/pkg/create-2023.3.0-beta","args":["-q"]}}],"newlyInstalled":false,"packages":[]}]
The json output can obviously be parsed with jq or similar tools and used in automation scripts. The http://127.0.0.1:33480 address will also open the Exchange UI in a browser.
The second listed port is another listening port (so it can be accessed in any browser via http://127.0.0.1:34080) for the Omniverse Navigator - the same can also be accessed in the launcher Nucleus tab - but we’ll take a look at Nucleus at a later time.
Composer & Presenter
Two of the most famous applications (and some of the very first ones a newcomer might try out) in Omniverse are USD Composer (formerly Create) and USD Presenter (formerly View).
The first is a 3D authoring program which allows users to compose complex scenes from 3D assets, applying physical properties to them, simulating and rendering, applying photorealistic materials and much more
Composer/Create is usually not equipped with 3D creation tools to model single 3D assets (think Blender) but rather orchestrates composition of a USD scene from external assets (although it could even become a modeling tool with the right extensions).
Presenter/View instead focuses on visualizing already composed environments and inspecting USD scenes (it doesn’t feature advanced authoring tools as Composer).
For the most parts of this book we will use USD Composer.
Almost all Omniverse applications are built on two core technologies: Carbonite and Kit.
Carbonite and Kit - the engines of the Omniverse
Carbonite and Kit are the two fundamental core technologies of Omniverse and they sit at different levels in the Omniverse software stack
Both Carbonite and Kit are developed and maintained by NVIDIA and are free to use within the EULA of Omniverse.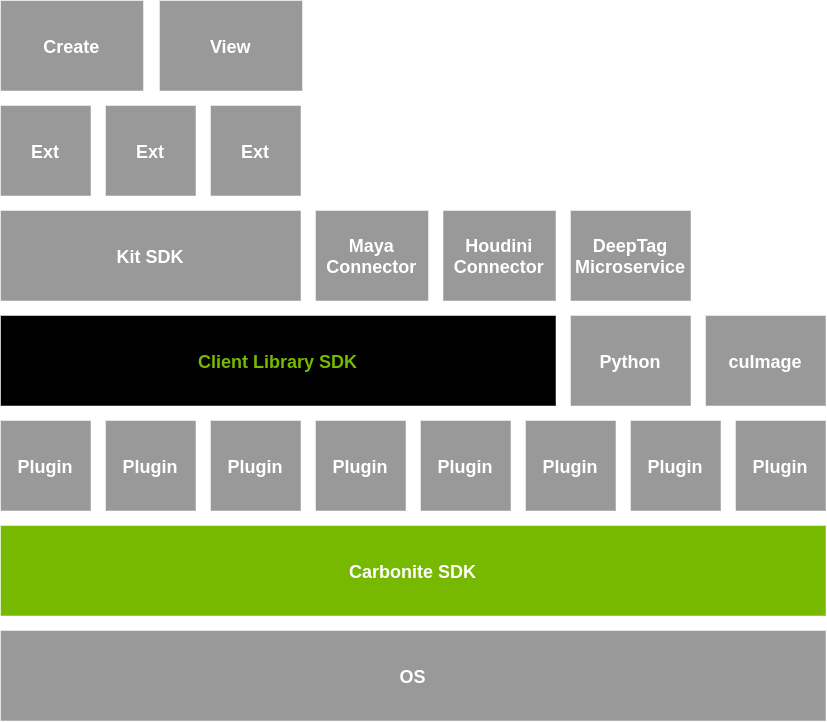
At the lowest layer, close to the operating system, there’s Carbonite.
Carbonite is a SDK which deals with the lower level details and provides platform-independent ABI stable interfaces (called Carbonite Interfaces) so that users can define their own C++ plugins and not worry about compatibility issues for their libraries within the Omniverse ecosystem, low-level facilities similar to those of the C++ standard libraries that span from file operations to multithreading, diagnostic tools (for example the famous CARB_LOG_WARN("some message here"); logging from C++) and much more.
Carbonite is a solid and extremely reliable foundation and on top of it there are carbonite plugins: those are low-level C++ libraries that depend on carbonite (but not on Kit). Carbonite loads those native C++ plugins (there’s no python involved here, the Python interpreter is loaded at a higher level and allows Omniverse developers to write extensions in Python on top of these plugins too) and also sets up facilities for the logging, profiling, configurations (and where to store the configuration settings, text config files? Toml files? and where?), tasking (multithreaded task launch without the hassle of the lower level details) and so on.
On top of these things we finally have another powerhorse: Kit.
Kit is a higher level SDK for building Omniverse applications and extensions. USD Composer (formerly called Create) and USD Presenter (formerly called View) are examples of Kit applications: a bundle of several extensions which provide all of the functionalities from mouse input to viewport rendering to physics simulation, etc.
Kit is also responsible for making major components available to extensions:
- USD and Hydra (a rendering engine for USD) -
omni.usd.libsis the extension that loads the USD native libraries (if you don’t know what these are, it is highly recommended that you study Learn OpenUSD first before diving more into Omniverse) - Nucleus accessing facilities (this makes collaborating on USD files easier - it’s the
Client Library SDKin the stack image above) - Carbonite facilities
- An advanced RTX renderer
- Python scripting
- An entire UI toolkit (
omni.ui) to create user interfaces quickly for your extensions
Kit is usually provided as an installed executable but it is actually a carbonite plugin itself.
Let’s create a simple python script which uses carbonite facilities and gets executed by your local kit instance. First locate any locally installed kit instance (if you installed Composer or Presenter or almost any app from the launcher you will have it installed in a local directory). You can find any of the installed paths via the launcher’s settings
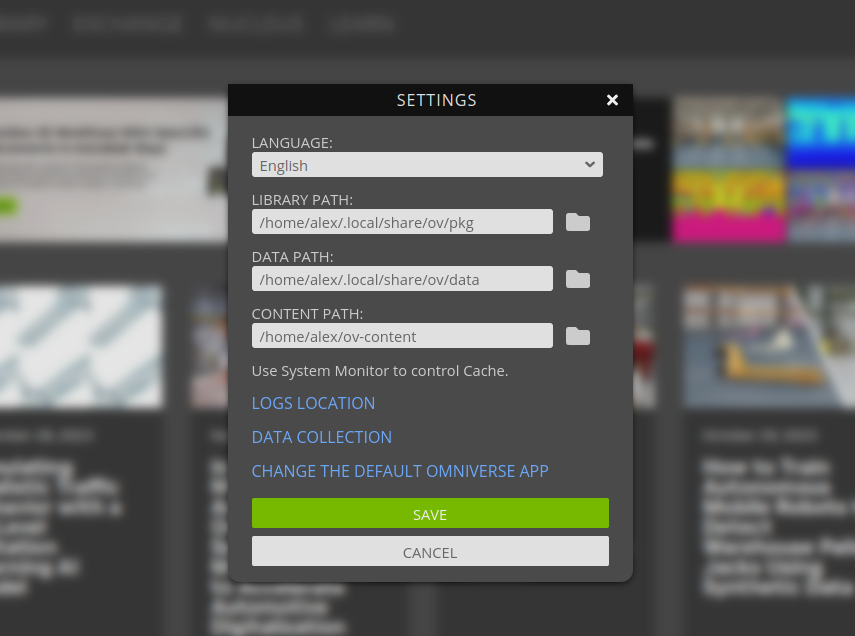
(or through some jq and curl-foo by asking the launcher for the installed path, if you’re so inclined).
import carb # use carbonite module (kit will make this immediately available)

carb.log_error("Hello error!")
Save it as main.py and execute it through kit:
$ ~/.local/share/ov/pkg/create-2023.3.0-beta/kit/kit --exec ./main.py
[Info] [carb] Logging to file: /home/alex/.nvidia-omniverse/logs/Kit/kit/105.2/kit_20231201_190206.log
2023-12-01 18:02:06 [88ms] [Error] [__main__] Hello error!
Congratulations: you’ve just run your first lines of code into Kit.
By default kit only loads basic extensions
$ ~/.local/share/ov/pkg/create-2023.3.0-beta/kit/kit --list-exts
[Info] [carb] Logging to file: /home/alex/.nvidia-omniverse/logs/Kit/kit/105.2/kit_20231201_190413.log
>>> Begin list of all local extensions:
[0] omni.app.content_browser-1.0.0
[1] omni.app.demo_checkpoint-1.0.0
[2] omni.app.demo_filepicker-1.0.0
[3] omni.app.demo_popup_dialog-1.0.0
[4] omni.app.dev-1.0.0
[5] omni.app.dev.legacy_viewport-1.0.0
[6] omni.app.dev.rtx-1.0.0
[7] omni.app.editor.base-105.2.0
[8] omni.app.empty-0.1.0
[9] omni.app.file_exporter-1.0.0
[10] omni.app.file_importer-1.0.0
[11] omni.app.full-1.0.1
[12] omni.app.hydra-0.1.0
[13] omni.app.mini-0.1.1
[14] omni.app.mini-hydra-0.1.0
[15] omni.app.nvindex-0.2.0
[16] omni.app.nvindex-remote-0.2.0
[17] omni.app.rtx.aovs-1.0.0
[18] omni.app.test_ext-1.0.0
[19] omni.app.test_ext_kit_sdk-1.0.0
[20] omni.app.uidoc-1.0.1
[21] omni.app.usdrt-1.0.1
[22] omni.app.usdrt.hydra-1.0.1
[23] omni.assets.plugins-0.0.0
[24] omni.client-1.0.2
[25] omni.kit.async_engine-0.0.0
[26] omni.kit.registry.nucleus-0.0.0
>>> End list (total: 27).
Anyway it can also load any other Omniverse extension by supplying the containing paths through --ext-folder directives. For instance you should probably have on your local installation an exts and an extscache directory that you can supply to kit in order for it to load all of the extensions that can be found in those folders.
Let’s modify our main.py script in order to modify something and display a custom messagebox by changing a popup dialog from the omni.app.demo_popup_dialog-1.0.0 extension which is a simple demo GUI extension:
import carb
import omni.kit.window.popup_dialog
from omni.kit.window.popup_dialog import MessageDialog

carb.log_error(f"Hello error! {app._window}")

app._popups[0] = MessageDialog(
    title="Hello this is a customized dialog!",
    message="hello hello",
    ok_handler=lambda dialog: print(f"All is fine"),
)
The MessageDialog popup is a very simple dialog provided by the omni.kit.window.popup_dialog extension.
$ ~/.local/share/ov/pkg/create-2023.3.0-beta/kit/kit --ext-folder ~/.local/share/ov/pkg/create-2023.3.0-beta/exts
  --ext-folder ~/.local/share/ov/pkg/create-2023.3.0-beta/extscache --enable omni.app.demo_popup_dialog-1.0.0 --exec ./main.py
# kit starts  up and loads all of the necessary dependencies and dependencies of the dependencies
# in order to run omni.app.demo_popup_dialog
[Info] [carb] Logging to file: /home/alex/.nvidia-omniverse/logs/Kit/kit/105.2/kit_20231201_192759.log
[0.116s] [ext: omni.kit.async_engine-0.0.0] startup
[0.119s] [ext: omni.assets.plugins-0.0.0] startup
[0.120s] [ext: omni.stats-0.0.0] startup
[0.121s] [ext: omni.client-1.0.2] startup
[0.134s] [ext: omni.gpu_foundation-0.0.0] startup
[0.143s] [ext: omni.rtx.shadercache.vulkan-1.0.0] startup
[0.144s] [ext: carb.windowing.plugins-1.0.0] startup
[0.151s] [ext: omni.kit.renderer.init-0.0.0] startup
[0.824s] [ext: omni.kit.loop-default-0.2.0] startup
[0.825s] [ext: omni.appwindow-1.1.5] startup
[0.829s] [ext: omni.kit.renderer.core-0.0.0] startup
[1.061s] [ext: omni.kit.renderer.capture-0.0.0] startup
[1.063s] [ext: omni.kit.renderer.imgui-0.0.0] startup
[1.140s] [ext: carb.audio-0.1.0] startup
[1.161s] [ext: omni.ui-2.21.9] startup
[1.173s] [ext: omni.uiaudio-1.0.0] startup
[1.174s] [ext: omni.kit.mainwindow-1.0.1] startup
[1.175s] [ext: omni.kit.uiapp-0.0.0] startup
[1.175s] [ext: omni.kit.actions.core-1.0.0] startup
[1.177s] [ext: omni.kit.window.popup_dialog-2.0.23] startup
[1.181s] [ext: omni.kit.commands-1.4.9] startup
[1.186s] [ext: omni.app.demo_popup_dialog-1.0.0] startup
[1.221s] app ready
# now our script is finally executed
2023-12-01 18:28:01 [1,218ms] [Error] [__main__] Hello error! DemoPopup
if you now click the first button of the window, it should activate your modified callback and create the Hello this is a customized dialog! window.
In the command used, with the --enable directive we singularly activated an extension (which must be found somewhere: either in the folders passed through the various --ext-folder or downloaded from a registry). A registry is a nucleus feature which allows kit applications to download dependencies via network. In the case above, had we not given the --ext-folder paths to find the locally installed extensions, the client nucleus extension would have downloaded the missing required dependencies from the default registry - the public NVIDIA one. Unless configured otherwise (your own company could use kit apps by loading them via .kit files which are text configuration files and where a custom your-company-only registry could have been used).
It can be useful to note that python-based extensions loaded are obviously comprised by python scripts: as long as kit knows where to find those script.py files, they can be safely executed through --exec. An example:
$ ~/.local/share/ov/pkg/create-2023.3.0-beta/omni.create.sh --exec 'open_stage.py /home/alex/usd_projects/my_cool_scene.usd'
  --/app/content/emptyStageOnStart=true
The command above will start kit via omni.create.sh on unix platforms (or equivalently omni.create.bat on Windows platforms) which is a shell script that, at the end of the day, invokes kit with just a text .kit file so it can instruct kit what extensions to load, what settings does it have to use, etc.
~/.local/share/ov/pkg/create-2023.3.0-beta$ ls apps
# Inside the `apps` folder there are text files .kit which if opened with kit, will
# load a predefined set of extensions listed in that same text file and customize kit
# in order to look as a completely different Omniverse app each time
exts.deps.generated.kit
omni.composer.kit
omni.create.hdstorm.kit
omni.create.legacy_viewport.kit
omni.create.testing.kit
omni.app.uidoc.kit
omni.create.full.kit
omni.create.kit
omni.create.racer.kit
omni.create.xr.kit
i.e. something like
$ ~/.local/share/ov/pkg/create-2023.3.0-beta/kit/kit ~/.local/share/ov/pkg/create-2023.3.0-beta/apps/omni.create.kit ..other_args..
This is described in great detail in the official documentation on kit files so it is highly encouraged to take a look at it.
So as long as the open_stage.py script (which is always installed along with the python extension omni.usd, e.g. in ~/.local/share/ov/pkg/create-2023.3.0-beta/extscache/omni.usd-1.10.22+17c3cf39.lx64.r.cp310/scripts/open_stage.py) can be found by the kit executable, it can be executed.
The final --/app/content/emptyStageOnStart=true overrides a default setting (in the namespace /app/content) to instruct kit, when loading everything that is needed in the omni.create.kit file with default values for each setting, not to start Omniverse USD Composer/Create with an empty stage: this is necessary otherwise our my_cool_scene.usd stage would have been loaded but then discarded because of Composer/Create loading an empty default stage template at startup.
At this point you should hopefully have developed a pretty good understanding of the main components of a regular Omniverse kit-based application and how the local architectural pieces operate together when you install something from the launcher.
Omniverse is meant to be an open platform that your company/business/personal workflow can leverage to automate, create custom advanced graphical services, quickly use and compose in whatever way you want AI services, world-class rendering technologies, industry-standard USD facilities and much more. Omniverse is flexible and you can hack it / tweak it / program it to do pretty much whatever you want it to do for you.
Nucleus
This section will present a brief overview of the Omniverse Nucleus feature. For in-depth informations it is recommended to check the official Nucleus documentation.
Nucleus is both a database and a collaboration engine for Omniverse. Nucleus allows multiple people to work on the same USD files collaboratively, non-destructively and having their changes synchronized in real-time across multiple people working on 3D assets, scene design and/or physical simulations setup, etc.
Nucleus is an advanced tool meant for Enterprise users (along with an Enterprise Omniverse license) but it can be freely used on a local workstation for teams up to 2 users as stated in the official docs.
Workstation Nucleus
The local usage of Nucleus, up to 2 users, starts in the launcher with Add Local Nucleus Server
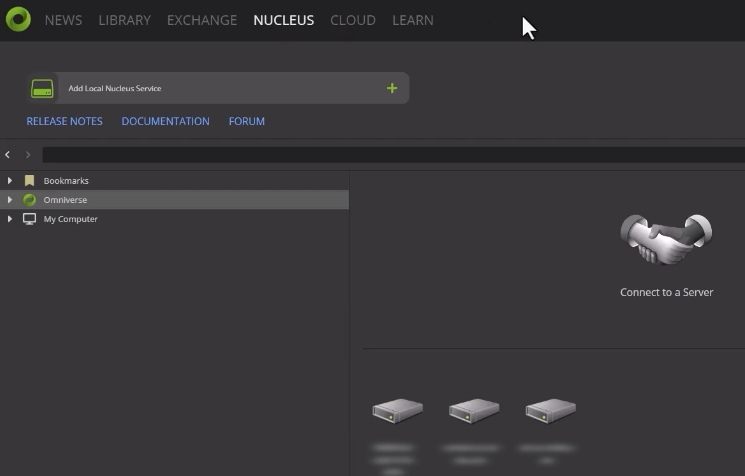
this will fire up a guided procedure to set up an administrator account for your local Nucleus server (think of installing a MySQL database locally). You’ll eventually be able to connect to your local Nucleus server and navigate in its directories through the Nucleus Navigator (again: available from the Launcher in the Nucleus tab or in the browser as discussed in the previous section).
The user interface should be quite easy to understand for people familiar with a unix environment: users, access permissions, folders organizations.. these are all features available in Nucleus.
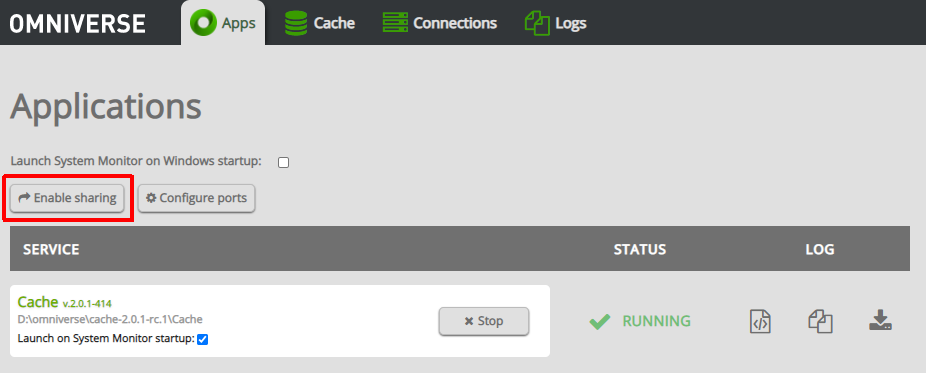
If you want another person to join your local Nucleus instance, head over to the navigator and in the Apps tab choose Enable sharing
After that just add another user from the Nucleus navigator and make sure the other person can reach your ip and port through your shared network. The other person will be able to use a generated invite link and/or manually add your local server to connect to
Both users are now able to launch a Kit application like OV Composer, connect to the shared Nucleus server (each application might have a different way to connect to Nucleus, for OV Composer you should add a new connection in the Content explorer)

and pick a USD file (or save one) from that Nucleus server. The other person should do the same and you can both collaborate on the same USD file. Pretty much like git or any version control, checkpoints will be generated along with recording the user who did the edit (and it’s always possible to go back to a previous modification).
Together with the power of USD layers (and again: it is highly recommended, if you haven’t already, to take a look at the OpenUSD file format), Nucleus makes working on graphical assets and scenes an advanced experience.
For more information refer to the video guide in the official docs: it is both easy to follow and very informative.
Enterprise Nucleus
Enterprise Nucleus Server can be deployed both on-premises or in a CSP (AWS/Azure/GCP/etc.). It includes a better caching mechanism, backup systems, SSO integrations, secure data transfers and other advanced features typically designed for enterprises.
Once again you’ll be able to find how to set enterprise servers up, configure them or deploy images/containers to CSPs in the official docs, e.g. using AWS’ CDK to generate the CloudFormation templates necessary for deployment on EC2 (code example here).
Enterprise Nucleus can also use DeepSearch: a AI-powered research engine which makes it easy to search for 3D assets in a large assets library for your organization (e.g. searching through 3D assets related to the word coffee might return the paths in your organization’s Nucleus server for cups, coffee bean sacks, coffee pots and other semantically-related coffee assets).
Connectors
Connectors are usually Omniverse plugins that use the Client Library SDK and typically connect to a Nucleus server to import/export (bidirectionally or sometimes unidirectionally - depends on the applications involved) OpenUSD files and live-sync modifications between a digital content creation program (DCC - this could be Blender, Maya, Unreal Engine, etc.) and Omniverse clients (a custom made app / a user using OV Composer / a user presenting in OV Presenter your work to customers, etc.).
Connectors can be installed as Maya plugins, Unreal Engine plugins, Blender add-ons, etc.. and can be found in the Launcher’s Exchange by filtering for Connectors

Of course if there’s no connector for the software that you’d like to link up to Omniverse, you can always develop your own connector by leveraging the connector samples and documentation. Knowledge of the OpenUSD format is usually required. Both C++ and Python code samples are available.
Services
Microservices are the last important category of Omniverse extensions: these are lightweight Omniverse extensions that leverage the omni.services extension to register REST endpoints (similar to normal REST API routes) and are meant to be called from the cloud or from a Omniverse Farm.
For more information on how to develop microservices the official documentation has some good resources. We’ll take a deeper look at how to develop Omniverse extensions in the following chapters; developing microservices will not be much different.
Extensions
Omniverse extensions are the core blocks of Omniverse. As already stated Kit apps are Kit instances loading different sets of extensions specified in .kit files: different extensions each modify part of the UI, add additional features that other extensions can leverage, provide different system functionalities, etc.
All Kit apps like Composer (formerly Create), Presenter (formerly View), Code, Machinima, IsaacSim and many others are assembled this way.
Developing an extension
Omniverse allows you to develop native C++ extensions (great for performance-intensive tasks), Python extensions (flexible, easy to write and well integrated into the UI framework) or mixed extensions (C++ and Python together with pybind11 bindings - this is a good tradeoff if you want for example your high-performance logic in native code and capable of interacting seamlessly with UI/user interaction code in Python).
Sample starting skeletons for both python/C++/mixed extension code samples are available in the NVIDIA official github here. Combined with the official detailed development documentation and kit manual docs (advanced), these can all be an excellent source of information on how to develop Omniverse extensions.
This chapter will focus on providing the easiest possible experience for a new Omniverse developer. We will first introduce Python only extensions (the easiest) and then work our way towards native C++ extensions and Hybrid extensions.
We will finally also introduce an unofficial Omniverse extension based on Conan and CMake for simplified dependency handling and build system generation. This might be a good way to start developing your own extensions with the utmost flexibility and control over your entire dependencies and building process.
Python Extensions
![]() All the code in this section is available in public NVIDIA repositories:
Read on to know the differences and which one you should use for your first extension.
All the code in this section is available in public NVIDIA repositories:
Read on to know the differences and which one you should use for your first extension.
Starting developing a Python-only Omniverse extension is quite easy compared to native or mixed extensions and allows you to experiment immediately with the full power of Omniverse.
As we already said before Python scripts (and an extension is no different) can be executed in Omniverse as long as the Python carbonite plugin is available. This means that there must be a Kit instance somewhere to run a Python extension.
The main difference between the NVIDIA-Omniverse/kit-extension-template repo and the NVIDIA-Omniverse/kit-project-template is exactly how the sample python extension gets to execute in a Kit instance:
kit-extension-template
In kit-extension-template two simple scripts (a .bat for Windows platforms and a .sh for unix platforms) are provided to look for locally installed Kit applications: be it OV Composer, OV Presenter, OV Code or something else.
As the README.md mentions, the Omniverse Launcher must be installed and at least one Omniverse Kit-based app should be installed. As we’ve already seen OV Launcher keeps a local port open to answer GET requests and provide the locally installed path of the omniverse kit-based applications. Executing link_app will call some platform-specific scripts developed by NVIDIA in the tools directory (this is a very common directory in OV extensions) and eventually execute the following actions:
- install python if not yet available (downloaded from a NVIDIA CDN)
- install packman which is a NVIDIA-maintained CDN and package manager which ensures Omniverse extensions and projects always have their dependencies available. Most Omniverse projects use
packmanunder the hood and its utility scripts often live in atools/packmansubdirectory. - determines where downloaded packages are to be stored on disk (
PM_PACKAGES_ROOT, by default$HOME/packman-repo) - ensures existence of
7zafor package decompression - calls some python scripts (
tools/scripts) to look for omniverse installed apps through the running launcher - create a soft symbolic link (linux) or symlink (windows) to the Kit-based app directory, so the
kitexecutable can be referenced through it
The most important folders in a Python extension repository like this reference one, are outlined below:
kit-extension-template/
├─ .vscode/ // contains configuration files to enhance visual studio code editing experience
├─ exts/omni.hello.world // contains the extensions for this repo. Extension names usually have the form
|  |                     // omni.your.extension (with dots between parts/namespaces)
|  ├─ config/ // usually contains extension.toml, the important text toml config for an extension
|  ├─ data/ // binary and/or images specific for this extension
|  ├─ docs/ // documentation files for this extension
|  ├─ omni/
|     ├─ hello/
|        ├─ world/ // if this is a simple py extension, .py code can live here and contain the __init__.py. If this
|           |         is a hybrid (C++ and python) extension, .py code usually goes in a "python" subdirectory here and
|           |         C++ code goes into a "plugins" subdirectory while C++ code for python bindings goes into a
|           |         "bindings" subdirectory. We'll see an example later.
|           ├─ tests/ // unit testing code, test cases are usually derived classes from omni.kit.test.AsyncTestCase
|                        see https://docs.omniverse.nvidia.com/kit/docs/kit-manual/latest/guide/testing_exts_python.html
├─ tools/ // contains NVIDIA-maintained shell/py scripts and tools to facilitate developing, building, publishing and
             documentingOV extensions
Since this is a very simple extension which just uses a Kit application already installed somewhere by something else to run a very simple Python extension, everything you need to zip if you wanted to redistribute your Python-only extension to someone else is entirely contained in the omni.hello.world folder. All the rest is just script stuff to facilitate developers to create symlinks to a local Kit installation so you can open in vscode your extension.py and related files and easily launch it into a Kit instance (or composer instance or presenter instance or anything else kit-based, really).
Here’s a sample run
$ git clone git@github.com:NVIDIA-Omniverse/kit-extension-template.git
# make sure OV launcher is running and OV Composer or any other kit-based app is installed
$ ./link_app.sh
Path is not specified, looking for Omniverse Apps...

Found following Omniverse Apps:
0: Nucleus Workstation (nucleus-workstation) at: '/home/alex/.local/share/ov/pkg/nucleus-workstation-2023.2.0'
1: Cache (cache) at: '/home/alex/.local/share/ov/pkg/cache-2023.2.0-rc.3'
2: USD Composer (create) at: '/home/alex/.local/share/ov/pkg/create-2023.3.0'

Selected app: nucleus-workstation
Creating a link '/tmp/kit-extension-template/tools/scripts/../../app' -> '/home/alex/.local/share/ov/pkg/nucleus-workstation-2023.2.0'
# Nope, nucleus won't do it because it doesn't have a `kit/kit` folder inside, not a kit-based app...
# let's pick another one
$ ./link_app.sh --app create # remember that OV Composer was formerly called Create
Path is not specified, looking for Omniverse Apps...

Found following Omniverse Apps:
0: Nucleus Workstation (nucleus-workstation) at: '/home/alex/.local/share/ov/pkg/nucleus-workstation-2023.2.0'
1: Cache (cache) at: '/home/alex/.local/share/ov/pkg/cache-2023.2.0'
2: USD Composer (create) at: '/home/alex/.local/share/ov/pkg/create-daily-2023.3.0'

Selected app: create
Creating a link '/tmp/kit-extension-template/tools/scripts/../../app' -> '/home/alex/.local/share/ov/pkg/create-2023.3.0'
packman(WARNING): Path '/tmp/kit-extension-template/tools/scripts/../../app' exists but is incorrect. Removing ...
Success!
At this point we can either do something like ./app/kit/kit --ext-folder ./exts --enable omni.hello.world or, if we want to run our sample extension along with other (almost 300) OV extensions in a full instance of OV Composer, we can use
$ ./app/omni.create.sh --ext-folder exts --enable omni.hello.world
note that in the same directory as the omni.create.sh script there are usually many other options like omni.create.singlegpu.sh to run OV composer in single-gpu mode, omni.create.hdstorm.sh to use the non-RTX OpenGL renderer, etc.. these scripts launch ./kit/kit with different settings and/or .kit files (.kit files are usually stored in the ./apps directory for convention, you can take a look at those there as well).
The process above can similarly be accomplished in the OV Composer Tools->Extensions browser UI
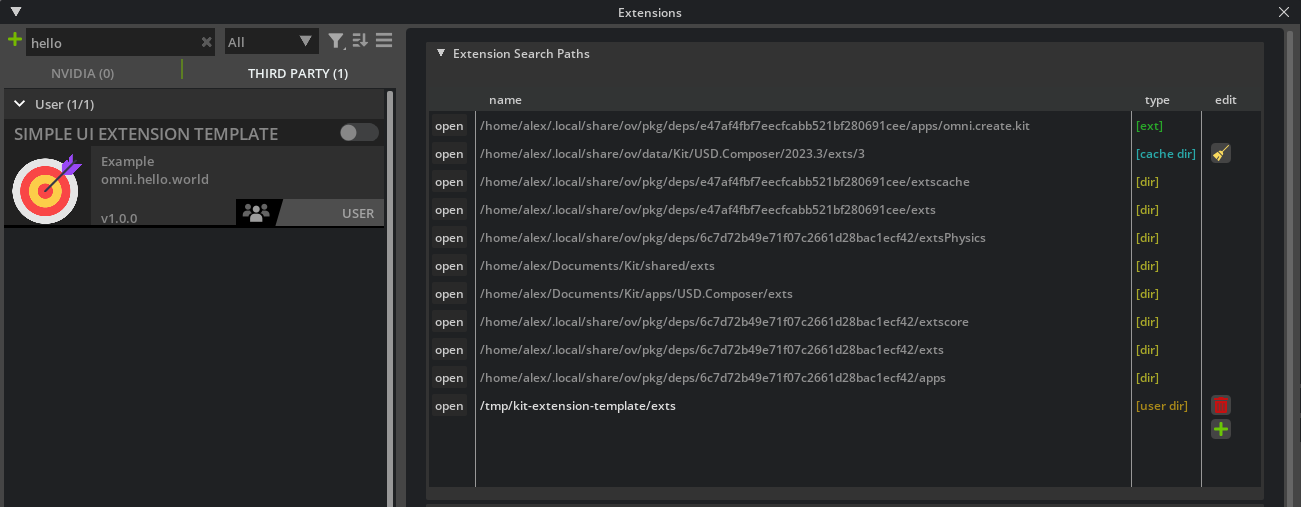
the Extensions Browser is also an extension itself (so it won’t be available unless the kit app has the owning extension omni.kit.window.extensions defined in its .kit file or loads it manually with --ext-folder and --enable parameters).
One final note: packman is just a very handy package manager from NVIDIA. One could have just as easily not used packman and set up the symlinks manually to launch the locally installed Kit-based app with our omni.hello.world extension loaded.
In general, everything in the tools/ directory can be safely copied to any other repository if you’re using the NVIDIA maintained utilities to set up, build and facilitate developing Omniverse extensions. In this case tools/ only had the packman tool and a custom-made script in scripts/, but we’ll see a more complex example in the next pagraph.
kit-project-template
The kit-project-template is more geared towards developing “projects” rather than extensions, i.e. extensions ‘packaged’ with all the necessary kit kernel to be e.g. zipped, sent to a user, extracted and (hopefully) work out of the box on an Omniverse capable RTX system.
Quoting from the official docs:
During build phase extensions are built (native), staged (copied and linked) into
_build/{platform}/{config}/extsfolder. Custom app (.kit file config) is used to enable those extensions.Each extension is a folder (or zip archive) in the end. You can write user code in python code only, or C++ only, or both. Ultimately extension archive could contain python code, python bindings (pyd/so files) and C++ plugins (dll/so). Each binary file is platform and configuration (debug/release) specific. For python bindings naming we follow Python standards.
This time running the same Python extension (still the same omni.hello.world window) will not require using an external already-installed kit app, but a smaller, lightweight essential Kit distribution will be downloaded instead:
$ git clone git@github.com:NVIDIA-Omniverse/kit-project-template.git
$ ./pull_kit_kernel.sh
Fetching python@3.10.5-1-linux-x86_64.tar.gz from bootstrap.packman.nvidia.com ...
# lots of deps are fetched ..
Package 'kit-kernel' at version '105.1+release.127680.dd92291b.tc.linux-x86_64.release' is missing from local storage.
Downloading from nvidia_cdn/kit_kernel.zip (68.8 MiB)
100.00% (speed 7.05 MiB/s)
Total of 9.76 seconds
Extracting: kit-kernel@105.1+release.127680.dd92291b.tc.linux-x86_64.release.zip (178 MiB)
100.00% (speed 171 MiB/s)
Total of 1.04 seconds
Package successfully installed to /home/alex/packman-repo-dir/etc..
# kit kernel is now fetched and a symlink ./kit is created
Fetching kit-kernel instead of a full-blown kit app means downloading a lot less stuff with a clean blank Kit slate (only essential files will be downloaded) - using OV Composer’s Kit instance, instead, would have probably meant downloading several Gigabytes of unneeded extensions to run our omni.hello.world.
The repository structure is very similar to the previous kit-extension-template with the addition of the pull_kit_kernel scripts which eventually just call into another script repo which invokes the repoman tool. Once again: one could have just as easily determined the right kit-kernel to download according to config (release/debug), platform (linux/windows) and kit version (these are defined in a packman .xml file in tools/deps/kit-sdk.packman.xml), downloaded it instead of packman from the NV CDN whose URL can be found in tools/packman/config.packman.xml and adjusted all the symlinks themselves. The lightweight kit-kernel by default gets downloaded to a temporary directory (something along the lines of ~/packman-repo on a unix platform) and symlinked to the repository’s root (kit/) so it’s immediately available to launch the extension via a source/apps/my_name.my_app.(bat|sh). These are just scripts that the authors of the repo decided to put in that subdirectory arbitrarily, the takeaway from these is that they all call the kit executable downloaded along with the lightweight kit-kernel dependency:
$ cat source/apps/my_name.my_app.sh # this script just calls the kit instance with a .kit file to load
# our sample extension

#!/bin/bash
set -e
SCRIPT_DIR=$(dirname ${BASH_SOURCE})
exec "$SCRIPT_DIR/../../kit/kit" "$SCRIPT_DIR/my_name.my_app.kit" "$@"
When it comes to packaging an extension to redistribute a single zip file though, especially if the extension is C++ or Hybrid (so it does require building as opposed to a simple Python extension), the repo_man collection of tools can be quite useful (repo_man gets downloaded via packman and invokes the right scripting tools like repo_build for OV native/hybrid extensions building, repo_package to create packages for extensions, repo_licensing for gathering and validating licenses of your dependencies, repo_format for py/C++ code linting via clang-format and pyblack, etc.).
Last piece of the puzzle is the packaging of this kit-project-template extension: as stated in the README.md to package it with this project skeleton just run tools/package.(bat|sh) (or repo package which invokes, under the hood, exactly the same tool: tools/packman/python.sh tools/repoman/repoman.py package, i.e. “use the python interpreter found/downloaded by packman, invoke repoman and execute the ‘package’ command”). The package will be created in the _build/packages folder.
All folders created via Omniverse repo_man, packaging or build files are internal and development only and not meant to be committed via git or redistributed around if they start with an underscore prefix _. E.g. _build, _repo, _compiler and so on. That’s the stuff that contains symlinks to create a virtual folder structure (e.g. to reference the right kit executable), that gets cleaned via git clean -dxf and that you should never write your code into.
Before continuing, it might be beneficial spending some words in the next section on the repo_man tools before moving on to native extensions and packaging which are more advanced concepts.
repo_man - the Omniverse Repo Tools Framework
Official docs: Repo Tools Framework
As already stated the repo_tools framework comprises several tools
kit-project-template$ ./repo.sh --help # which actually calls 'tools/packman/python.sh tools/repoman/repoman.py "$@"'
usage: repo [-h] [-v] [-p] [-pr] [-pt] [-tb] [--set-token CUSTOM_TOKENS] [TOOL] ...

Repo Tool (repoman):
    One entry point for all repo tools. Pass one of the tools and -h to get help.

options:
  -h, --help            show this help message and exit
  -v, --verbose         Increase verbosity of logging. Pass -v for info, -vv for verbose.
  -p, --print-config-file
                        Output tool default config file and exit.
  -pr, --print-resolved-config
                        Output tool resolved config and exit.
  -pt, --print-tokens   Output all known tokens and exit.
  -tb, --tracebacks     Enable Python traceback logging to console + TeamCity buildProblem reporting.
  --set-token CUSTOM_TOKENS
                        You can define and set custom tokens. Token name and value should be colon delimited e.g.: `--set-token test_token:test_value`. A
                        single token definition can be set per `--set-token` call.

Found tools:
    build            Build system main command.
    ci               Entry point to CI jobs.
    changelog        Utilities related to generating changelogs and release notes
    format           Format all C++ code (with clang-format) and all python code (with black).
    kit_autoupdate   Tool to automatically update kit dependency to latest version and push changes.
    link_app         Tool to create a folder link to an App in Omniverse Launcher.
    pull_extensions  Tool to pull kit kernel and extensions before running.
    package          Tool to package an Omniverse app ready to be run by Launcher or as standalone.
    stage_for_github Tool to strip down parts of repo and stage for github.
    tracetools       CLI and GUI tool to manage source links in packman project files.
    bump             Tool to bump versions of Kit extensions and apps.
    licensing        Module to gather and/or validate licenses in a package
    update           Tool to update packman project files with newer versions of packages. By default major part of version is kept the same when looking for a newer version.
    publish          Publish archives (packages) and labels to packman remote.
    build_number     Tool to generate build number.
    packman          Shortcut to packman.
    _package         Package files, folders, build artifacts.
    source           CLI and GUI tool to manage source links in packman project files and kit extensions.
    test             Test Runner.
    stubgen          Tool to generate stub files (.pyi) for python modules compiled with pybind11.
    precache_exts    Tool to precache kit apps. Downloads extensions without running.
    ui_docstring     Generate docstring macros for omni.ui.

Run as 'repo [TOOL] -h' for more information on a specific tool.
The bare minimum directory structure to use repo_man, by convention, is committing into your repository (which might contain as well an ext/omni.hello.world python extension, a source/extensions/omni.hello.world C++ extension or a some_other_made_up_subpath/omni.my.cool.ext hybrid extensions) the tools directory containing
kit-project-template/
├─ tools/
   ├─ packman/
      ├─ bootstrap/
      ├─ config.packman.xml
      ├─ ...
   ├─ repoman/
      ├─ repoman.py
i.e. the complete bootstrapping scripts for packman and the main repoman.py bootstrapping file (which will call the actual repo_man tool after packman has downloaded it).
Inside repoman.py there’s usually something like
REPO_ROOT = os.path.join(os.path.dirname(os.path.realpath(__file__)), "../..")
REPO_DEPS_FILE = os.path.join(REPO_ROOT, "deps/repo-deps.packman.xml")
the REPO_DEPS_FILE is the starting dependencies xml text file which describes which repo_man tools should be downloaded first via packman (e.g. if this repository contains at least one native/hybrid C++ extension, you might probably want the repo_build tool.. otherwise you might have to invoke the build system yourself manually - which in OV’s case is premake, we’ll see more about this later - and generate the Makefiles/.sln solution files and build everything yourself, repo_build takes care of all these things for you) because they will be needed by many later stages of building the repository extensions, setting up a Kit instance to test those extensions, packaging those extensions (which involves removing CI-sensitive data, gathering licenses, etc.) and publishing them to a registry so other Omniverse users can pull them and use them.
The first dependencies file is usually in deps/repo-deps.packman.xml but it can be located anywhere really.
kit-project-template$ cat deps/repo-deps.packman.xml
<project toolsVersion="5.0">
  <dependency name="repo_build" linkPath="../_repo/deps/repo_build">
    <package name="repo_build" version="0.40.0"/>
  </dependency>
  <dependency name="repo_ci" linkPath="../_repo/deps/repo_ci">
    <package name="repo_ci" version="0.5.1" />
  </dependency>
  <dependency name="repo_changelog" linkPath="../_repo/deps/repo_changelog">
    <package name="repo_changelog" version="0.3.0" />
  </dependency>
  <dependency name="repo_format" linkPath="../_repo/deps/repo_format">
    <package name="repo_format" version="2.7.0" />
  </dependency>
  <dependency name="repo_kit_tools" linkPath="../_repo/deps/repo_kit_tools">
    <package name="repo_kit_tools" version="0.12.18"/>
  </dependency>
  <dependency name="repo_licensing" linkPath="../_repo/deps/repo_licensing">.
    <package name="repo_licensing" version="1.11.2" />
  </dependency>
  <dependency name="repo_man" linkPath="../_repo/deps/repo_man">
    <package name="repo_man" version="1.32.1"/>
  </dependency>
  <dependency name="repo_package" linkPath="../_repo/deps/repo_package">
    <package name="repo_package" version="5.8.5" />
  </dependency>
  <dependency name="repo_source" linkPath="../_repo/deps/repo_source">
    <package name="repo_source" version="0.4.2"/>
  </dependency>
  <dependency name="repo_test" linkPath="../_repo/deps/repo_test">
    <package name="repo_test" version="2.5.6"/>
  </dependency>
</project>
The dependency file above tells packman which packages to download (and packman is by default configured to download these from the config.packman.xml public NV CDN), which versions and what symbolic links to create for these tools: in this case multiple directories will be created in the root of the repository, each one in _repo/deps/toolname (remember underscore-_prefixed directories are development/internal only in the Omniverse build system).
You can inspect these directories yourself and take a look at the various repo_man scripts.
repo.toml
In the root of a repo_man repository there must be a repo.toml file which can even be empty.
This file (each .toml file is just configuration directives) contains configurations for the repo_man tools.
In the kit-project-template sample repository there is this one:
$ cat repo.toml
########################################################################################################################
# Repo tool base settings
########################################################################################################################

[repo]

# import two other repo.toml files, these two have directives for packman and configurations for the various tools
# specifically for one purpose: make sure that this repository, which is a kit-based repository, has everything it
# needs to work as a kit-instance extensions repository (repo_kit_tools/kit-template/repo.toml).
# Plus it's an external public user-facing repository, not an NVIDIA internal one (repo_kit_tool/kit-template/repo-external.toml).
import_configs = [
    "${root}/_repo/deps/repo_kit_tools/kit-template/repo.toml",
    "${root}/_repo/deps/repo_kit_tools/kit-template/repo-external.toml",
]

# some other settings..
extra_tool_paths = [
	"${root}/kit/dev",
]

[repo_precache_exts]
# Apps to run and precache so it'll load faster..
apps = [
    "${root}/source/apps/my_name.my_app.kit"
]
Notice the import_configs, this is similar to C++ #include <header> directives: it imports another configuration directly in that text file part (see docs here).
If you take a look inside the repo_kit_tools/kit-template/repo.toml you’ll find some more directives for a generic kit-based extensions-containing repository:
# of course do this _after_ having run repo_man once to create all the _repo/deps/etc. symlinks..
kit-project-template$ cat _repo/deps/repo_kit_tools/kit-template/repo.toml
[repo_build]

# List of packman projects to pull (in order)
fetch.packman_host_files_to_pull = [
    "${root}/deps/host-deps.packman.xml",
]

fetch.packman_target_files_to_pull = [
    "${root}/deps/app.packman.xml",
    "${root}/deps/kit-sdk.packman.xml", # <---- also fetch whatever is defined in this file!
    "${root}/deps/kit-sdk-deps.packman.xml",
    "${root}/deps/rtx-plugins.packman.xml",
    "${root}/deps/target-deps.packman.xml",
    "${root}/deps/assets.packman.xml",
    "${root}/deps/ext-deps.packman.xml",
]
Note that the deps/kit-sdk.packman.xml file is also used to fetch other dependencies (this is the text xml file where kit-sdk dependencies are usually defined, i.e. what kit-sdk version to use, whether it’s a full-blown kit or just a kit-kernel, is it release, debug, etc. - or maybe even local on some filesystem path and we want to use that one instead of downloading one from the internet), then there are others (kit-sdk-deps - additional dependencies specifically for the kit sdk, target-deps - dependencies of the target itself, i.e. of your own repository, this would be a good place to put the PhysX SDK if your extension called into its native C++ engine libraries, etc.).
Note that in the kit-project-template there’s also a deps/user.toml file. That is not part of repo_man but rather an override .toml file for Kit instances: see documentation here.
To summarize, a common Kit-based repository containing Omniverse extensions and using repo_man structure might look like the following:
my-kit-project/
├─ _build/ // build directory. This is development only. Contains build artifacts and the folder structure
|          // that is needed to find the kit instance, the apps/whatever.kit files that define the extensions for
|          // a specific kit application, the symlinks to the data/ folders (for resources/videos/icons/etc.),
|          // the target-deps/ folders where PhysX SDK or pip packages your extension depends on might live, etc.
|          // Everything here is usually platform-specific and configuration (release/debug) specific.
├─ deps/ // this directory could be somewhere else or miss entirely, but it's usually in this spot for convention
|     ├─ repo-deps.packman.xml // repo_man tools that this repository will use
|     ├─ kit-sdk.packman.xml // which kit to download (or find somewhere in the local filesystem)
|     ├─ target-deps.packman.xml // which dependencies to download for the extensions in this repository
├─ tools/ // base packman and repoman bootstrapping scripts (these get checked in into git)
   ├─ packman/
      ├─ bootstrap/
      ├─ config.packman.xml
      ├─ ...
   ├─ repoman/
      ├─ repoman.py
├─ repo.toml // base repo_man mandatory toml. Can be empty.
├─ repo.(sh|bat) // this is optional, makes calling into tools/repoman/repoman.py easier.
Using dependencies in your local machine (not from packman’s CDN)
In case you wanted to have your application link (in case of C++ code) or depend and use a kit instance or any other dependency library not downloading it from packman but finding it somewhere on your local filesystem, the repo_man tool can help setting that up very easily:
kit-project-template$ ./repo.sh source link /home/alex/some-kit-kernel-I-previously-downloaded
Found matching package: kit-kernel in: /home/alex/some-kit-kernel-I-previously-downloaded
Adding link: kit-kernel '../../kit' -> '/home/alex/some-kit-kernel-I-previously-downloaded/kit'
Writing file: '/home/alex/kit-project-template/deps/kit-sdk.packman.xml.user'...
Done
This creates, together with the deps/kid-sdk.packman.xml file, an override text xml file called deps/kid-sdk.packman.xml.user. .user files are override files, i.e. they take precedence over whatever dependency with the same name is defined in the .xml file with their same name (after dropping .user). In this case the .user file that repo.sh source link some_local_path added contains:
$ cat deps/kit-sdk.packman.xml.user
<project toolsVersion="5.6">
	<dependency name="kit-kernel" linkPath="../../kit">
		<source path="/home/alex/some-kit-kernel-I-previously-downloaded/kit" />
	</dependency>
</project>
One could have avoided all this hassle in the first place by just writing the original deps/kit-sdk.packman.xml file as
<project toolsVersion="5.0">
  <dependency name="kit-kernel" linkPath="../../kit" tags="${config} non-redist">
    <!-- <package name="kit-kernel" version="105.1+release.127680.dd92291b.tc.${platform}.${config}"/> -->
    <source path="/home/alex/some-kit-kernel-I-previously-downloaded/kit" />
  </dependency>
</project>
but a .user file is usually preferable:
- it doesn’t get committed into git (if the
.gitignoreexcludes it, that is) - it’s easier to just revert to the internet-downloaded package by just removing all of the
.useroverride files.
These .user overrides are meant for local development only and not for redistributing/permanent dependencies.
Native C++ extensions
Having some understanding of the repo_man build system is going to be highly beneficial for developing the most powerful type of Omniverse extensions: C++ native extensions. Compared to simple Python scripts extensions, these are somewhat more complicated from a build and development standpoint. Of course the upside is the performance boost that these extensions can leverage via native compiled C++ code linked directly into the Omniverse system.
![]() All the code in this section is available in the public NVIDIA repository: kit-extension-template-cpp. Read on for an in-depth explanation.
All the code in this section is available in the public NVIDIA repository: kit-extension-template-cpp. Read on for an in-depth explanation.
The kit-extension-template-cpp repository is larger than the previous sample ones because it includes all of the necessary build system scripts and files, plus several different C++ and mixed extensions to demonstrate various Omniverse technologies (including USDRT and Fabric, which we will cover later in this book).
Dependencies
Perhaps the most important new script in the kit-extension-template-cpp repo is the repo_man invocation of the Repo Build tool:
kit-extension-template-cpp$ cat ./build.sh
#!/bin/bash
set -e
SCRIPT_DIR=$(dirname ${BASH_SOURCE})
# invokes 'python tools/repoman/repoman.py build' in the current working directory through the repo.sh script
source "$SCRIPT_DIR/repo.sh" build $@ || exit $?
As before, as soon as repo_man will start, it will invoke packman to download all the NVIDIA CDN-provided packages listed in deps/*.packman.xml files. This repository will use a fair deal of Kit and its bundled extensions, plus it’s meant to be used as a development repository (hence many extensions and libraries should be available to developers), therefore it doesn’t pull a lightweight kit-kernel out of packman but rather a full-blown Kit package.
kit-extension-template-cpp$ cat deps/kit-sdk.packman.xml
<project toolsVersion="5.0">
  <!-- We always depend on the release kit-sdk package, regardless of config -->
  <dependency name="kit_sdk_${config}" linkPath="../_build/${platform}/${config}/kit" tags="${config} non-redist">
    <package name="kit-sdk" version="105.1+release.127680.dd92291b.tc.windows-x86_64.release" platforms="windows-x86_64" checksum="78b6054c730a44b97e6551eae9e17f45384621f244d4babde5264a1d6df3038f" />
    <package name="kit-sdk" version="105.1+release.127680.dd92291b.tc.linux-x86_64.release" platforms="linux-x86_64" checksum="2f8357eda2de9232c0b4cb345eb6c4d3c3aa8c4c9685ed45d4bfe749af57b0b8" />
  </dependency>
</project>
As before, the code above will pull some packman packages (verified by checksum) according to platform, configuration, etc. and create symlinks in <repo_root>/_build/linux-x86_64/release/[symlinks_here] to them. This will ensure that when we run a Kit application with a kit file from the scripts like <repo_root>/_build/linux-x86_64/release/omni.app.example.extension_browser.sh for example, it will invoke the sym-linked kit (which was downloaded in some temporary location by packman, usually indicated by the PM_PACKAGES_ROOT environment variable if set or otherwise defaulted to some ~/packman-repo location) with the appropriate already-defined kit file in <repo_root>/_build/linux-x86_64/release/apps/some_kit_file.kit. These .kit files will, in turn, load as they please some/all of the the repository extensions because the same <repo_root>/_build/linux-x86_64/release/apps folder is, in fact, another symlink to <repo_root>/source/apps where we git-committed a list of .kit files to customize the kit-based application where we want to launch our extension in. We could have written an entire .kit file for a OV composer here, or just a very basic .kit file with our extension and the bare additional minimum to make it work, e.g.
kit-extension-template-cpp$ cat source/apps/omni.app.example.extension_browser.kit
# An application is really just an extension that depends on other extensions.

[package]
title = "Example Application: Extension Browser"
description = "An example application that runs kit with the minimal set of extensions required to use the extension browser."
keywords = ["app"] # Makes this browsable in the UI under the "experience" filter.

[dependencies]
"omni.kit.uiapp" = {}
"omni.kit.window.extensions" = {}
# Add new extensions here if you want them enabled automatically when this app is run.
# Otherwise, you can search for them in the extensions window and enable/disable them.
<---- add your repository's source/extensions/omni.whatever extension here!!! the bare minimum
uiapp/window.extensions for UI and extensions browser have already been added in the lines above ---->

[settings]
app.exts.folders.'++' = ["${app}/../exts"] # Make extensions from this repo available to kit.
app.menu.legacy_mode = false # So the extension window shows up
app.windowtitle = "Example Application: Extension Browser"
app.windowwidth = 1700
app.windowheight = 900
There’s also another interesting file in this repo: deps/kit-sdk-deps.packman.xml
kit-extension-template-cpp$ cat deps/kit-sdk-deps.packman.xml
<project toolsVersion="5.0">
  <!-- Import dependencies from Kit SDK to ensure we're using the same versions. -->
  <import path="../_build/${platform}/${config}/kit/dev/all-deps.packman.xml">
    <filter include="carb_sdk_plugins"/>
    <filter include="cuda"/>
    <filter include="doctest"/>
    <filter include="pybind11"/>
    <filter include="python"/>
  </import>

  <!-- Override the link paths to point to the correct locations. -->
  <dependency name="carb_sdk_plugins" linkPath="../_build/target-deps/carb_sdk_plugins"/>
  <dependency name="cuda" linkPath="../_build/target-deps/cuda"/>
  <dependency name="doctest" linkPath="../_build/target-deps/doctest"/>
  <dependency name="pybind11" linkPath="../_build/target-deps/pybind11"/>
  <dependency name="python" linkPath="../_build/target-deps/python"/>

</project>
this file, compared to the deps/kit-sdk.packman.xml, doesn’t directly declare package names for packman to import from whatever CDN it was configured with. But rather imports other dependencies from the same Kit package we downloaded and symlinked when the deps/kit-sdk.packman.xml file was processed (so this file gets invoked afterwards by repo_man). Through the filter directive, just some of the packages in that imported file get in scope (without those filter, all of the dependencies in that file would have been pulled). This makes sure that our project gets the carb_sdk_plugins, cuda, etc. dependencies packages but exactly those same versions which the downloaded Kit depends on. This ensure compatibility between our native C++ code and whatever versions that pulled Kit is using. The <dependency/> directives below are just for fixing the symlinks to those resolved packages so they are available in <repo_root>/_build/target-deps/[packagename] for easier premake build scripts.
You can inspect the other deps files but if you’ve followed through here, they should be a pretty straightforward reading.
premake5 build scripts
In deps/host-deps.packman.xml there’s a premake dependency: premake is a build projects generator (e.g. it can generate visual studio project files and GNU makefiles) that uses the Lua scripting language in order to be quite easy to use and is known for having a less steep learning curve than other counterparts like CMake.
Omniverse extensions often uses premake to parse their project definition scripts and generate the project files that repo_build can later invoke with the right compilers to generate the binaries. This is of course usually not needed in simple Python-only based extensions, but it’s necessary in C++ and hybrid extensions.
Under the hood repo_man invokes the repo_build tool that does something like
/tmp/kit-extension-template-cpp/_build/host-deps/premake/premake5 --file=/tmp/kit-extension-template-cpp/premake5.lua gmake2
  --platform-host=linux-x86_64 --scripts=/home/alex/packman-repo/chk/repo_build/0.44.6/lua --verbose
  --solution-name=kit-extension-template-cpp --os=linux
to automatically add the extensions’ premake5.lua files to be parsed. The extensions to be built should reside in <repo_root>/source/extensions/* - take a look at the repo_kit_tools tool-provided lua script _repo/deps/repo_kit_tools/kit-template/premake5-kit.lua:
-- Include all extensions in premake using glob (each has own premake5.lua file)
function m.autoinclude_extensions()
    for _, ext in ipairs(os.matchdirs(root.."/source/extensions/*")) do
        if os.isfile(ext.."/premake5.lua") then
            include (ext)
        end
    end
end
Native Makefiles (or visual studio projects) will be generated by premake in the internal/dev_only _compiler/[your_build_system] folder. For example you can inspect the generated Makefiles here. Some more information on the premake5.lua files can be found here in some official docs.
Nothing prevents a developer to write his own build scripts and/or drop repo_man and write his own deps/build workflow for his extensions, Omniverse makes these development tools available to streamline a comfortable and reliable development experience on a complex ecosystem which is always improving and changing. Omniverse’s build system might even change in the future, but NVIDIA has always strived to provide a consistent and easy-to-use development software platform for Omniverse.
Native C++ extensions structure
An Omniverse native C++ extension usually either exposes C++ methods (through pybind11 bindings) to the Python scripts which are later loaded and executed by the Kit Python runtime (this is also the preferred way of interacting with omni.ui and other python-based GUI frameworks), or it usually defines some carbonite interfaces (think of them as abstractions over .dll/.so dynamic library calls for Omniverse carbonite plugins) which can be used from other extensions to use your extension’s functionalities. Typical example: the mixed core extension omni.ext has C++ classes compiled into binaries that you download via carb_sdk dependency
# example path for compiled omni.ext
/home/alex/packman-repo/chk/carb_sdk+plugins.linux-x86_64/150.11+release150.tc9105.e71ee788/..
_build/linux-x86_64/release/libomni.ext.plugin.so
and also ships C++ headers exposing carbonite interfaces which you can consume from your C++ Omniverse extensions
# header for omni.ext
/home/alex/packman-repo/chk/carb_sdk+plugins.linux-x86_64/150.11+release150.tc9105.e71ee788/..
include/omni/ext/IExt.h
together with Python bindings that you can load and call from your Python scripts
# this allows you to import omni.ext in python
/home/alex/packman-repo/chk/carb_sdk+plugins.linux-x86_64/150.11+release150.tc9105.e71ee788/..
_build/linux-x86_64/release/bindings-python/omni/ext/_extensions.cpython-310-x86_64-linux-gnu.so
of course a C++ native extension could as well do neither of the above, but most native or hybrid extensions in Omniverse do.
Recall from chapter1 that extensions are also carbonite plugins (which is a lower level definition independent from Kit - just relying on the Carbonite SDK). This explains why Omniverse extensions usually expose Carbonite interfaces or implement these low-level C-like interfaces and why C++ native files sit in a plugins folder in a typical native extension directory structure. Here’s an example:
kit-extension-template-cpp/
├─ source/
   ├─ extensions/
      ├─ omni.example.cpp.hello_world/
         ├─ config/ // the 'extension.toml' file lives here. Tokens, which python modules and which C++ plugins
         |          // are exposed by this extension are specified here along with some copyright, title, UI info
         |          // for the Omniverse Extensions Browser GUI as well.
         ├─ data/ // Binary data for the extension
         ├─ docs/ // Documentation and Changelog for the extension
         ├─ omni/example/cpp/hello_world/ // Hierarchy of folders with the same extension name with the Python files
         |  ├─ __init.py__ // startup init for the python module
         |  ├─ scripts/ // Python scripts exposing python stuff
         ├─ plugins/ // This is where C++ code lives: these are where the C++ carbonite plugins live
         |  ├─ omni.example.cpp.hello_world/
         |     ├─ SomeCppFileImplementingCarboniteInterface.cpp
         ├─ premake5.lua // Building premake script using repo_kit_tools exposed methods and facilities
Inside the config/extension.toml there’s also something important:
kit-extension-template-cpp$ cat source/extensions/omni.example.cpp.hello_world/config/extension.toml
[package]
version = "1.0.0" # Semantic Versioning is used: https://semver.org/

# These fields are used primarily for display in the extension browser UI.
title = "Example C++ Extension: Hello World"
... truncated ...

# Define the Python modules that this extension provides.
# C++ only extensions need this just so tests don't fail.
[[python.module]]
name = "omni.example.cpp.hello_world"

# Define the C++ plugins that this extension provides.
[[native.plugin]]
path = "bin/*.plugin"
i.e. the python module directory (from the extension build folder) and where the carbonite plugin-interfaces C++ files are contained (again from the extension build folder).
Read the ‘Extensions In-Depth’ official docs for more information on this topic.
To understand why we’re looking for python modules in that directory and for native carbonite plugins in the bin/*.plugin, let’s take a look under _build at how the final folder structure for the compiled native extension looks like:
# Note that we're already in _build
/tmp/kit-extension-template-cpp/_build$ ll ./linux-x86_64/release/exts/omni.example.cpp.hello_world
total 32
drwxr-xr-x  4 alex alex 4096 dic  5 16:28 ./
drwxr-xr-x 15 alex alex 4096 dic  5 16:28 ../
drwxr-xr-x  2 alex alex 4096 dic  5 16:28 bin/
lrwxrwxrwx  1 alex alex   85 dic  5 16:28 config -> /tmp/kit-extension-template-cpp/source/extensions/omni.example.cpp.hello_world/config/
lrwxrwxrwx  1 alex alex   83 dic  5 16:28 data -> /tmp/kit-extension-template-cpp/source/extensions/omni.example.cpp.hello_world/data/
lrwxrwxrwx  1 alex alex   83 dic  5 16:28 docs -> /tmp/kit-extension-template-cpp/source/extensions/omni.example.cpp.hello_world/docs/
lrwxrwxrwx  1 alex alex   83 dic  5 16:28 omni -> /tmp/kit-extension-template-cpp/source/extensions/omni.example.cpp.hello_world/omni/
drwxr-xr-x  2 alex alex 4096 dic  5 16:28 PACKAGE-LICENSES/
/tmp/kit-extension-template-cpp/_build$ ll ./linux-x86_64/release/exts/omni.example.cpp.hello_world/bin
total 616
drwxr-xr-x 2 alex alex   4096 dic  5 16:28 ./
drwxr-xr-x 4 alex alex   4096 dic  5 16:28 ../
-rwxr-xr-x 1 alex alex 620288 dic  5 16:28 libomni.example.cpp.hello_world.plugin.so*
/tmp/kit-extension-template-cpp/_build$ ll ./linux-x86_64/release/exts/omni.example.cpp.hello_world/omni/example/cpp/hello_world/
total 12
drwxrwxr-x 2 alex alex 4096 dic  5 10:23 ./
drwxrwxr-x 3 alex alex 4096 dic  5 10:23 ../
-rw-rw-r-- 1 alex alex  480 dic  5 10:23 __init__.py
/tmp/kit-extension-template-cpp/_build$
This final-built folder structure was created through symlinks to original source config files and binary directories (binaries and everything build-system-generated are never stored on the original source/ directories so they can be committed into git or whatever version control you’re using) is created by the repo_kit_tools premake5 lua scripts when source/extensions/omni.example.cpp.hello_world is run
/tmp/kit-extension-template-cpp$ cat source/extensions/omni.example.cpp.hello_world/premake5.lua
-- Setup the extension. This uses repo_kit_tools facilities to gather this very same extension's data and paths
-- (if you respected the folder structure, of course)
local ext = get_current_extension_info()
project_ext(ext)

-- Create symlinks in the final build directory for folders that should be packaged with the extension
-- (and usually committed in git)
repo_build.prebuild_link {
    { "data", ext.target_dir.."/data" },
    { "docs", ext.target_dir.."/docs" },
    { "omni", ext.target_dir.."/omni" },
}

-- Build the C++ plugin that will be loaded by the extension. By convention it should have name
-- omni.whatever.extension_name.plugin
-- A carbonite plugin must also implement the omni::ext::IExt interface if it's meant to be
-- automatically loaded by the extension system at startup.
-- This will also create the final folder structure automatically.
project_ext_plugin(ext, "omni.example.cpp.hello_world.plugin")
    local plugin_name = "omni.example.cpp.hello_world"
    add_files("source", "plugins/"..plugin_name)
    includedirs { "plugins/"..plugin_name }
This is a very simple premake5.lua build script but it demonstrates the power of the Omniverse build tools framework: if we abide by the expected folder structure, most of the things we need to worry about can be safely ignored or taken for granted - the build system will take care of them for us and provide an easier Omniverse development experience.
C++ code for native extensions
A C++ extension might expose any number of Carbonite plugin interfaces for others to consume. In mixed/hybrid C++ and Python extensions, one would usually write python code to startup the extension:
# This is usually in a file in the scripts/ folder
import omni.ext

class ExampleMixedExtension(omni.ext.IExt): # entry point for the extension
    def __init__(self):
        super().__init__()
        # here one can also call C++ methods from the pybind11 bindings of this same extension (see folder bindings/)

    def on_shutdown(self):
        pass
the same if the extension is just a simple Python-only extension: you would have a class deriving from omni.ext.IExt in python that acts as entrypoint for the Kit extensions system. C++ source code in this case would only expose some carbonite plugin interfaces that can be invoked by the python code through pybind11 bindings.
If you have a C++ carbonite plugin (remember that this is a lower level than Kit) and you want to turn it into a native-only Kit extension, i.e. without any python code whatsoever in the Kit extension, you can avoid python altogether by using a specially-added carbonite interface: omni::ext::IExt. This interface is defined as a C++ class with some pure methods that a derived class is supposed to reimplement (much like the class ExampleMixedExtension(omni.ext.IExt) python code above but in C++) and that is not meant to be exported to other plugins.
This is how the omni.example.cpp.hello_world C++-only native-only from-carbonite-plugin-to-kit-extension work in the kit-extension-template-cpp repository: the code defines a C++ class derived from omni::ext::IExt (omni::ext::IExt being the new carbonite COM-like interface that gets implemented in the hello_world plugin) and the key parts that need to be available for generating the translation unit boilerplate needed by the carbonite system are the following:
#define CARB_EXPORTS

#include <carb/PluginUtils.h>

#include <omni/ext/IExt.h>
#include <omni/kit/IApp.h>

// A PID - Plugin Implementation Descriptor for this plugin
const struct carb::PluginImplDesc pluginImplDesc = { "omni.example.cpp.hello_world.plugin",
                                                     "An example C++ extension.", "NVIDIA",
                                                     carb::PluginHotReload::eEnabled, "dev" };

// The carbonite plugin implementation DEPENDENCIES. These are the carbonite interfaces that
// this plugin depends on and that it would like to be available. This macro generates the correct
// carbonite boilerplate code to be later able to do something like
//    omni::kit::IApp* app = carb::getFramework()->acquireInterface<omni::kit::IApp>();
// see https://docs.omniverse.nvidia.com/kit/docs/carbonite/latest/docs/CarboniteInterfaces.html
CARB_PLUGIN_IMPL_DEPS(omni::kit::IApp)

// some namespaces for your symbols..
namespace omni
{
  namespace example
  {
    namespace cpp
    {
      namespace hello_world
      {

        // When this extension is enabled, any class that derives from omni.ext.IExt
        // will be instantiated and 'onStartup(extId)' called. When the extension is
        // later disabled, a matching 'onShutdown()' call will be made on the object.
        // omni::ext::IExt is a carbonite interface and it has a CARB_PLUGIN_INTERFACE()
        // macro inside its definition:
        //
        // class IExt {
        // public:
        //     CARB_PLUGIN_INTERFACE("omni::ext::IExt", 0, 1); <--- versioned interface
        //     virtual void onStartup(const char* extId) = 0; // to be implemented somewhere else
        class ExampleCppHelloWorldExtension : public omni::ext::IExt
        {
        public:
          // These HAVE to be implemented because IExt has pure virtuals for these..
            void onStartup(const char* extId) override {
                printf("ExampleCppHelloWorldExtension starting up (ext_id: %s).\n", extId);

                // Get the app interface from the Carbonite Framework, this is made possible by the CARB_PLUGIN_IMPL_DEPS
                if (omni::kit::IApp* app = carb::getFramework()->acquireInterface<omni::kit::IApp>()) {
                  // etc..
                }
            }

            void onShutdown() override {
                printf("ExampleCppHelloWorldExtension shutting down.\n");
                // ..
            }

            // ..

        private:
            // ..
        };
      }
    }
  }
}

// The interfaces that this plugin IMPLEMENTS. These can also be derived classes of abstract interfaces.
CARB_PLUGIN_IMPL(pluginImplDesc, omni::example::cpp::hello_world::ExampleCppHelloWorldExtension)

// This is empty but also important: this symbol NEEDS to be defined. This routine usually serves for populating
// a carbonite interface, but as we said IExt is special and it's just a machinery to avoid python for native-only
// C++ extensions
void fillInterface(omni::example::cpp::hello_world::ExampleCppHelloWorldExtension& iface) {
  // you can also use CARB_UNUSED(iface) here
}
It is highly recommended to take a look at the nicely commented header files code in carb_sdk.whatever/include/carb/PluginUtils.h and other headers in that directory for more information.
There’s also another project going on at Carbonite to implement Omniverse Native Interfaces that would address some of the standard carbonite interfaces drawbacks, but it’s still a beta project being worked on so we won’t focus on it yet.
This is a common and practical way to create a native-only C++-only Kit extension (directly from a Carbonite plugin) without writing a single line of Python code. All the facilities needed to link the right Carbonite libraries and set up the build tools are provided by the premake5.lua project definitions.
Carbonite plugins which are NOT Omniverse Kit extensions
It goes without saying that one can also write a Carbonite plugin which is not a Kit extension by writing parts of that same boilerplate generated by CARB_PLUGIN_IMPL when a class derived from omni::ext::IExt is passed to it:
plugins/MyCarboniteInterface.h
#pragma once

#include <carb/Types.h>

namespace omni {
  namespace custom {
    struct IMyCarboniteInterface {
      CARB_PLUGIN_INTERFACE("my_custom_plugin::IMyCarboniteInterface", 0, 1);

      void(CARB_ABI* some_method_to_print_stuff_from_my_cpp_code)();
    };
  }
}
plugins/MyCustomPlugin.cpp
#define CARB_EXPORTS

#include "MyCarboniteInterface.h"

const struct carb::PluginImplDesc kPluginImpl = { "omni.custom.plugin", "MyCustomPlugin", "Alex",
                                                  carb::PluginHotReload::eDisabled, "dev" };

CARB_PLUGIN_IMPL(kPluginImpl, omni::my::custom::plugin::IMyCarboniteInterface)
CARB_PLUGIN_IMPL_DEPS(/* any other carbonite interface this plugin might depend on */);

namespace omni {
  namespace custom {

    MyCustomClass *someGlobalHere = nullptr;

    void internal_implementation_of_some_method_to_print_stuff() {
      CARB_LOG_WARN("hello world!");
      someGlobalHere->some_more_complicated_stateful_logic();
    }
  }
}

// Populates the 'jumptable' towards our internal methods in this same translation unit code.
// This will be invoked when this carbonite plugin will be loaded so other carbonite plugins can use it.
void fillInterface(omni::custom::IMyCarboniteInterface& iface) {
  using namespace omni::custom::IMyCarboniteInterface;
  iface.some_method_to_print_stuff_from_my_cpp_code = internal_implementation_of_some_method_to_print_stuff;
}

// Carbonite plugin startup routine - called when the carbonite plugin is loaded for the first time
CARB_EXPORT void carbOnPluginStartup() {
  // in a not-so-recommended C-like fashion, global variables might even be initialized here..
  someGlobalHere = ...;
}
CARB_EXPORT void carbOnPluginShutdown() {
  // destroy someGlobalHere..
}
The code above is a lower level carbonite plugin and not Omniverse extension: you won’t be able to load it as a Kit extension.It uses low-level Carbonite entrypoints (carbOnPluginStartup and carbOnPluginShutdown) and shows a classic Carbonite way of populating Carbonite interfaces with the fillInterface() method (which must be defined).
In general: if you use carbonite function pointers in your interface:
struct IMyCarboniteInterface {
  CARB_PLUGIN_INTERFACE("my_custom_plugin::IMyCarboniteInterface", 0, 1);

  void(CARB_ABI* some_method_to_print_stuff_from_my_cpp_code)();
};
you should populate them at fillInterface() time or callers will erroneously call unbound methods.
If you define carbonite interfaces as base classes with pure virtual calls:
class IExampleUsdInterface {
public:
  CARB_PLUGIN_INTERFACE("omni::example::cpp::usd::IExampleUsdInterface", 1, 0);

  virtual void createPrims() = 0; // Create some example prim in the current USD context using C++
};
(just like the previous example with omni::ext::IExt does), then you should subclass that class and implement the required methods. And the fillInterface() symbol must be defined but the function can be empty:
class ExampleCppUsdExtension : public IExampleUsdInterface {
public:
  void createPrims() override {
    // whatever
  }
}
CARB_PLUGIN_IMPL(pluginImplDesc, omni::example::cpp::usd::ExampleCppUsdExtension)
void fillInterface(omni::example::cpp::usd::ExampleCppUsdExtension& iface) {
  // Empty
}
This is valid for any Carbonite plugin (not considering the beta ONI interfaces).
Mixed/Hybrid Omniverse C++ and Python extensions
![]() All the code in this section is available in the public NVIDIA repository: kit-extension-template-cpp. Read on for an in-depth explanation.
All the code in this section is available in the public NVIDIA repository: kit-extension-template-cpp. Read on for an in-depth explanation.
When you have Python and C++ mixed (sometimes referred as hybrid) Omniverse extensions, the extension manager usually works with Python object returned from some get_extensions() method: that’s why in the omni.example.cpp.usd extension (and other mixed extensions like omni.example.cpp.pybind) in the sample repo kit-extension-template-cpp the extension entry point is in the Python scripts:
# This is usually in a file in the scripts/ folder
import omni.ext

class ExampleMixedExtension(omni.ext.IExt): # entry point for the extension
    def __init__(self):
        super().__init__()
        # here one can also call C++ methods from the pybind11 bindings of this same extension (see folder bindings/)

    def on_shutdown(self):
        pass
from the Python code the extension can execute other Python code and also invoke the Carbonite framework and Carbonite plugins. As already stated in the previous section, the Carbonite omni::ext::IExt interface is instead a special type of Carbonite interface that allows the Carbonite plugin to be registered as a Kit extension (i.e. something of a higher object that can be used by the Kit extensions system).
That said, let’s now take a look at how mixed extensions implement C++/Python bindings to let Python extensions communicate and use C++ Carbonite plugin interfaces.
omni.example.cpp.usd is a good example for Python-C++ mixed interoperativity.
After building the kit-extension-template-cpp repo (./build.sh -r to only build release), one can just run /tmp/kit-extension-template-cpp$ ./_build/linux-x86_64/release/omni.app.kit.dev.sh, open the Window->Extensions Extension Browser and activate the omni.example.cpp.usd extension. The extension is found locally from the compiled repository (somewhere in the _build folder) thanks to the .kit file that the Kit app is being launched with:
$ cat source/apps/omni.app.kit.dev.kit
[package]
title = "Kit Dev App With Example Extensions"
description = "The default kit dev app with extensions from this repo made available."
version = "1.0.0"
keywords = ["app"]

[dependencies]
"omni.app.dev" = {}

[settings.app.exts]
folders.'++' = ["${app}/../exts"] # This adds the _build/linux-x86_64/release/exts path to the extensions list!

[[test]]
enabled = false
For more information on this check the Extension Search Path documentation: we basically made our local extensions visible to the launched kit app (which looks a bit like a miniature Omniverse USD Composer).
Python bindings
The omni.example.cpp.usd example shows a typical folder structure in Omniverse mixed extensions: the bindings/ folder is the common place where to store C++ files for the C++/Python pybind11 bindings.
pybind11 is a high-performance open-source commercially-viable Python-C++ binding library. It allows to:
- use C++ classes and functions in Python as if they were native Python objects
- Pass Python objects to C++ functions and return C++ objects to Python
- Define custom operators, iterators, callbacks, and exceptions for your C++ types
..and much more. It also minimizes the overhead of calling C++ from Python and viceversa by leveraging modern C++11 features to generate compact and efficient code that can run faster than pure Python or other binding libraries (and it’s also a lightweight library that only depends on Python and the C++ standard library).
Omniverse employs it by default and provides build system facilities and Carbon support but again - nothing stops a developer from using their own solution.
Before taking a look at bindings/, let us dissect the C++ files in plugins/ which expose the Carbonite interfaces that we want to make available from the Python side of the Kit extension:
source/extensions/omni.example.cpp.usd/plugins/omni.example.cpp.usd/ExampleUsdExtension.cpp
#define CARB_EXPORTS

const struct carb::PluginImplDesc pluginImplDesc = { "omni.example.cpp.usd.plugin",
                                                     "An example C++ extension.", "NVIDIA",
                                                     carb::PluginHotReload::eEnabled, "dev" };
// As seen before, if we use virtual pure methods in a carbonite interface, we can provide one or multiple
// implementations: in this plugin we provide a derived class implementation so these methods can be called
// by whoever acquires the carbonite interface and calls its methods.
// Read https://openusd.org/dev/api/page_tf__notification.html (and please learn OpenUSD first!) to understand
// why we also derive from pxr::TfWeakBase (spoiler: it's to check whether this object has been freed or not
// before registering it with
//    pxr::TfNotice::Register(PXR_NS::TfCreateWeakPtr(this), &ExampleCppUsdExtension::onObjectsChanged);
class ExampleCppUsdExtension : public IExampleUsdInterface
                             , public PXR_NS::TfWeakBase
{
protected:
    void createPrims() override {
      /*
        Some fancy OpenUSD C++ code to create prims on a stage and make them spin (local and global rotation)
        by updating OpenUSD-defined pxr::UsdGeomXformOp on the local op stack every time the carbonite-managed
        Kit update event loop fires a recurring update event

        Did I mention that learning OpenUSD *before* learning Omniverse can be extremely beneficial?
        Please read https://omniverseusd.github.io/chapter4/transformations.html for more information.
       */
       ...
    }
The code should be rather straightforward after running the extension and seeing what the end result should be:
-
createPrims()is the main C++ call which we want to expose to Python code via pybind11 bindings -
Carbonite
IAppinterface exposes the main Kit app plugin functionalities (check out the documentation here) and after creating the prims on the stage registers a callback to be called at each Kit update event// Subscribe to update events so we can animate the prims. if (omni::kit::IApp* app = carb::getCachedInterface<omni::kit::IApp>()) { m_updateEventsSubscription = carb::events::createSubscriptionToPop(app->getUpdateEventStream(), [this](carb::events::IEvent*) { onUpdateEvent(); }); } -
The current stage is detected via a
onDefaultUsdStageChanged()callback. This is called directly through the Python bindings (so from the Python code) to let the C++ code operate on a valid USD stage (again: if you haven’t already, check out LearnOpenUSD before proceeding further into Omniverse).
Also refer to the Carbonite API for more information on this example’s code.
These methods are then exposed via a classic carbonite plugin interface
source/extensions/omni.example.cpp.usd/include/omni/example/cpp/usd/IExampleUsdInterface.h
#pragma once

#include <carb/Interface.h>

class IExampleUsdInterface {
public:
    /// @private
    CARB_PLUGIN_INTERFACE("omni::example::cpp::usd::IExampleUsdInterface", 1, 0);

    virtual void createPrims() = 0;
    virtual void removePrims() = 0;
    // .. etc .. //
    virtual void onDefaultUsdStageChanged(long stageId) = 0;
};
Note that this is in a header file: this header will be shared between the C++ code in plugins/whatever and the C++ pybind11 code needed to generate the Python bindings module in bindings/.
Let’s now take a look at the C++ code for the pybind11 bindings in the bindings/ folder:
source/extensions/omni.example.cpp.usd/bindings/python/omni.example.cpp.usd/ExampleUsdBindings.cpp
// Carbonite provides utility macros and templates to operate with pybind11 on Omniverse projects
// when exposing carbonite plugin interfaces
#include <carb/BindingsPythonUtils.h>
// Include the header exposing the carbonite interface that we want to export to the Python code
#include <omni/example/cpp/usd/IExampleUsdInterface.h>

// Declares a compilation unit for python bindings - see packman-repo/etc../carb_sdk../include/carb/BindingsUtils.h
CARB_BINDINGS("omni.example.cpp.usd.python")

// Disable pybind RTTI to let it get along in an ABI-safe way with the Carbonite system
DISABLE_PYBIND11_DYNAMIC_CAST(omni::example::cpp::usd::IExampleUsdInterface)

namespace { // no symbols clashes please

  // Define a pybind11 module using the same name specified in the premake5.lua
  // This will allow
  //    import _example_usd_bindings
  // to import the generated python bindings module (if symlinks are properly set in the _build directory by the
  // premake5.lua file)
  PYBIND11_MODULE(_example_usd_bindings, m)
  {
      using namespace omni::example::cpp::usd;

      m.doc() = "pybind11 omni.example.cpp.usd bindings";

      // Carbonite template classes to wrap a IExampleUsdInterface carbonite plugin interface and
      // expose it as a python object that can be acquired via acquire_etc and released via release_etc.
      // methods.
      carb::defineInterfaceClass<IExampleUsdInterface>(
          m, "IExampleUsdInterface", "acquire_example_usd_interface", "release_example_usd_interface")
          .def("create_prims", &IExampleUsdInterface::createPrims)
          .def("remove_prims", &IExampleUsdInterface::removePrims)
          .def("print_stage_info", &IExampleUsdInterface::printStageInfo)
          .def("start_timeline_animation", &IExampleUsdInterface::startTimelineAnimation)
          .def("stop_timeline_animation", &IExampleUsdInterface::stopTimelineAnimation)
          .def("on_default_usd_stage_changed", &IExampleUsdInterface::onDefaultUsdStageChanged)
      /**/;
  }
}
This is the pybind11 Carbonite-wrapped code that allows, directly from your Python code, to call into a Carbonite C++ interface
source/extensions/omni.example.cpp.usd/python/impl/example_usd_extension.py
import omni.ext
import omni.usd
# We will see in the premake5.lua file that the python bindings module (a .so/.dll library) is built into
# _build/linux-x86_64/release/exts/omni.example.cpp.usd/omni/example/cpp/usd
from .._example_usd_bindings import *

# A global object to keep the carbonite plugin interface object so we can call its methods
_example_usd_interface = None

# An accessor method for the exposed carbonite interface. Can be used in a public API.
def get_example_usd_interface() -> IExampleUsdInterface:
    return _example_usd_interface

# Use the extension entry points to acquire and release the interface,
# and to subscribe to usd stage events
class ExampleUsdExtension(omni.ext.IExt):
    def on_startup(self):
        # Acquire the example USD interface.
        global _example_usd_interface
        _example_usd_interface = acquire_example_usd_interface()

        # Inform the C++ plugin if a USD stage is already open
        usd_context = omni.usd.get_context()
        if usd_context.get_stage_state() == omni.usd.StageState.OPENED:
            _example_usd_interface.on_default_usd_stage_changed(usd_context.get_stage_id())

        # Subscribe to omni.usd stage events so we can inform the C++ plugin when a new stage opens.
        self._stage_event_sub = usd_context.get_stage_event_stream().create_subscription_to_pop(
            self._on_stage_event, name="omni.example.cpp.usd"
        )

        # Print some info about the stage from C++.
        _example_usd_interface.print_stage_info()

        # Create some example prims from C++.
        _example_usd_interface.create_prims()

        # Print some info about the stage from C++.
        _example_usd_interface.print_stage_info()

        # Animate the example prims from C++.
        _example_usd_interface.start_timeline_animation()

    def on_shutdown(self):
        global _example_usd_interface

        # Stop animating the example prims from C++.
        _example_usd_interface.stop_timeline_animation()

        # Remove the example prims from C++.
        _example_usd_interface.remove_prims()

        # Unsubscribe from omni.usd stage events.
        self._stage_event_sub = None

        # Release the example USD interface.
        release_example_usd_interface(_example_usd_interface)
        _example_usd_interface = None

    # Call into C++'s onDefaultUsdStageChanged when we detect a USD stage change
    def _on_stage_event(self, event):
        if event.type == int(omni.usd.StageEventType.OPENED):
            _example_usd_interface.on_default_usd_stage_changed(omni.usd.get_context().get_stage_id())
        elif event.type == int(omni.usd.StageEventType.CLOSED):
            _example_usd_interface.on_default_usd_stage_changed(0)
As you can see from the code above the Python bindings made it possible to acquire and expose the Carbonite interface plugin quite easily via _example_usd_interface = acquire_example_usd_interface(), free it via release_example_usd_interface(_example_usd_interface) and access any method like _example_usd_interface.create_prims().
The last piece of the puzzle is taking a look at the premake5.lua build scripts. Most of the premake helpers in this script are imported by other premake Omniverse helpers like _build/linux-x86_64/release/kit/dev/premake5-public.lua (e.g. look for add_files in there).
source/extensions/omni.example.cpp.pybind/premake5.lua
-- Setup the extension. Uses repo_man provided helpers.
local ext = get_current_extension_info()
project_ext(ext)

-- Create symlinks in the _build directory for folders that should be packaged and available with the extension
repo_build.prebuild_link {
    { "data", ext.target_dir.."/data" },
    { "docs", ext.target_dir.."/docs" },
}

-- We will now find TWO projects: Python scripts don't need to be built, they just need correct symlinks to find
-- the right modules when importing them. But the native C++ carbonite plugin needs a project. And also the C++
-- pybind11 project that uses the C++ files in the bindings/ directory and generates the C++/Python .so bindings
-- binary.

-- Build the first, i.e. the Carbonite C++ plugin that will be loaded by the extension
project_ext_plugin(ext, "omni.example.cpp.usd.plugin")
    -- add source files (both .h and .cpp) under a 'include' and 'source' virtual directories (see premake's docs
    -- https://premake.github.io/docs/files and https://premake.github.io/docs/vpaths)
    add_files("include", "include/omni/example/cpp/usd")
    add_files("source", "plugins/omni.example.cpp.usd")
    -- add needed include directories (also in target_deps - downloaded from packman)
    includedirs {
        "include",
        "plugins/omni.example.cpp.usd",
        "%{target_deps}/nv_usd/release/include" }
    -- specify linking libraries directories (also provided by packman)
    libdirs { "%{target_deps}/nv_usd/release/lib" }
    -- which libs to link against
    links { "arch", "gf", "sdf", "tf", "usd", "usdGeom", "usdUtils" }
    -- other standard C++ compilation settings
    defines { "NOMINMAX", "NDEBUG" }
    runtime "Release"
    rtti "On"

    -- architecture-specific compilation settings
    filter { "system:linux" }
        exceptionhandling "On"
        staticruntime "Off"
        cppdialect "C++17"
        includedirs { "%{target_deps}/python/include/python3.10" }
        buildoptions { "-D_GLIBCXX_USE_CXX11_ABI=0 -Wno-deprecated-declarations -Wno-deprecated -Wno-unused-variable -pthread -lstdc++fs -Wno-undef" }
        linkoptions { "-Wl,--disable-new-dtags -Wl,-rpath,%{target_deps}/nv_usd/release/lib:%{target_deps}/python/lib:" }
    filter { "system:windows" }
        buildoptions { "/wd4244 /wd4305" }
    filter {} -- disable filters, after this, premake directives will again apply to any architecture

-- The second project: the python bindings C++ plugin (this is also a carbonite plugin).
-- Grep for 'function project_ext_bindings(args)' in _build/linux-x86_64/release/kit/dev/premake5-public.lua if
-- you're interested in its documentation (note that this is lua, functions can also be called with the {} syntax)
project_ext_bindings {
    ext = ext,
    project_name = "omni.example.cpp.usd.python",
    module = "_example_usd_bindings", -- important: the python module name to generate. This must match the python's import
    src = "bindings/python/omni.example.cpp.usd", -- where the C++ files for the bindings are to be found
    target_subdir = "omni/example/cpp/usd" -- where to generate the bindings binary module in the _build/etc./<extension_root>
}
    -- C++ headers - as we've said these are shared between these two projects
    includedirs { "include" }
    -- Python scripts are not compiled therefore we just symlink to the original ones through the
    -- _build/etc./omni.example.cpp.usd/omni/example/cpp/usd/impl symlink in the _build directory. This means that
    -- when executing the extension code in a kit app, we'll be executing the real source *.py files. This also makes
    -- hot-reloading (i.e. when you modify an extension's *.py files, that extension is automatically reloaded if the file
    -- is saved) possible in Omniverse, and that makes python development a lot easier, especially when dealing with omni.ui code.
    repo_build.prebuild_link {
        { "python/impl", ext.target_dir.."/omni/example/cpp/usd/impl" },
        -- also add the tests folder. Unit tests are first-class in Omniverse: C++ uses doctests (see other example extensions
        -- grepping for "#include <doctest/doctest.h>" and Python uses omni.kit.test
        -- (https://docs.omniverse.nvidia.com/kit/docs/kit-sdk/latest/source/extensions/omni.kit.test/docs/index.html)
        { "python/tests", ext.target_dir.."/omni/example/cpp/usd/tests" },
    }
The build script is heavily commented and quite verbose but it should provide maximum readability and comprehensive explanations of why we added two projects in a mixed C++/Python extension.
Omniverse exposes all the necessary facilities to develop this kind of extensions which, given their potential to exploit Python prototyping, expressiveness and development rapidity together with C++ raw performance, interoperability and features, are arguably one of the most powerful tools in your Omniverse development arsenal to engineer your own graphics-intensive system.
A mixed(hybrid) extension based on Conan and CMake
![]() All the code in this section is available in this book's repository: conan_cmake_template. Read on for an in-depth explanation.
All the code in this section is available in this book's repository: conan_cmake_template. Read on for an in-depth explanation.
Let’s now present an alternate way of developing C++/Python Omniverse extensions by leveraging Conan for dependency management and CMake as build system.
ov_utils and the Conan recipes for OV binary packages are to be considered a Proof-Of-Concept project!
There will be libraries missing, wrong include paths and many more issues that you should be aware of. Pull requests are welcome to update packages, fixup paths and add advanced functionalities for others to include in their OV extensions!
The bulk of our extension will reside in the omni.hello.world/ folder:
conan_cmake_template/
├─ omni.hello.world/
    ├─ bindings/ // C++ pybind11 Python bindings code resides here
    |   ├─ ExampleBindings.cpp
    ├─ config/ // the 'extension.toml' file lives here.
    ├─ data/ // icon.png, preview.png
    ├─ docs/ // changelog, readme
    ├─ include/ // Shared headers between bindings/ and plugins/
    |   ├─ omni
    |       ├─ hello
    |           ├─ world
    |               ├─ IExampleCarbInterface.h
    ├─ plugins/ // Native C++ code
    |   ├─ ExampleExtension.cpp
    ├─ python/ // Python module
        ├─ scripts/
        |   ├─ hello_world_extension.py
        ├─ __init__.py
If you’ve read through the previous sections this structure should be pretty familiar: we have a Carbonite C++ plugin built in plugins/ that will link against the carb_sdk dependency downloaded as a collection of binaries and installed locally from a ov_utils/deps/carb_sdk Conan recipe.
Then there’s a Python module (the main Python module of the extension) residing in python/ whose main logic sits in hello_world_extension.py (__init__.py is for the module startup). These python scripts don’t need any building, just that their final deployment folder structure matches the [[python.module]] directive in the config/extension.toml file
# Define the Python modules that this extension provides.
# C++ only extensions need this just so tests don't fail.
[[python.module]]
name = "omni.hello.world"

# Define the C++ plugins that this extension provides.
[[native.plugin]]
path = "bin/*.plugin"
i.e. that the folder structure that will be created in the _build/ folder (where we put the build process final artifacts and simulate a fully-deployed Kit-app installation path as well) will have a <extension_root>/omni/hello/world folder structure where the python module’s __init.py__ will reside.
The bindings/ folder contains the Pybind11 code to create C++ python bindings: The ExampleBindings.cpp file shares the header defined in the include/ folder to know which Carbonite interface the generated binding library should use to call into the native C++ Carbonite plugin. There will be two binary artifacts from this process: a shared library generated from the native C++ code of the extension (plugins/) residing in _build/your_platform/release/exts/omni.hello.world/bin (and specified in the config/extension.toml in the [[native.plugin]] directive) and a binding library generated from pybind11 C++ code (sitting in _build/your_platform/release/exts/omni.hello.world/omni/hello/world/bindings which is just a symlink to let the hello_world_extension.py python script find it with the relative path from ..bindings._example_carb_bindings import *). Both are native code architecture-specific and OS-specific so if you plan or distributing your extension to other users you should make sure to ship an appropriate version of these binaries.
The native C++ Carbon plugin uses exactly the same pattern seen before for the Carbonite interface, with some added code taken from the official samples to adapted to print whatever’s on the current USD stage
class ExampleExtension : public IExampleCarbInterface, public PXR_NS::TfWeakBase {
public:

    void setStageFromStageId(long stageId) override {
        if (stageId) {
            m_stage = PXR_NS::UsdUtilsStageCache::Get().Find(PXR_NS::UsdStageCache::Id::FromLongInt(stageId));
        }
    }

    void printStageInfo() const override {

        if (!m_stage) {
            return;
        }

        CARB_LOG_WARN("---Stage Info Begin---\n");

        // Print the USD stage's up-axis.
        const PXR_NS::TfToken stageUpAxis = PXR_NS::UsdGeomGetStageUpAxis(m_stage);
        CARB_LOG_WARN("Stage up-axis is: %s.\n", stageUpAxis.GetText());

        // Print the USD stage's meters per unit.
        const double metersPerUnit = PXR_NS::UsdGeomGetStageMetersPerUnit(m_stage);
        CARB_LOG_WARN("Stage meters per unit: %f.\n", metersPerUnit);

        // Print the USD stage's prims.
        const PXR_NS::UsdPrimRange primRange = m_stage->Traverse();
        for (const PXR_NS::UsdPrim& prim : primRange) {
            CARB_LOG_WARN("Stage contains prim: %s.\n", prim.GetPath().GetString().c_str());
        }

        CARB_LOG_WARN("---Stage Info End---\n\n");
    }
private:
    PXR_NS::UsdStageRefPtr m_stage;
};
The kit SDK dependency is Conan-provided, together with some apps/.kit files to kickstart a simple viewport-enabled OVComposer-like app with the omni.hello.world extension loaded. Thanks to the _build/ folder structure it is enough to run it like this
conan_cmake_template$ $ ./_build/linux-x86_64/release/kit/kit ./_build/linux-x86_64/release/apps/omni.app.kit.dev.kit
to start the OV app where you can later create an empty stage and have the omni.hello.world kick in and print from C++ some debug stats on the opened USD stage.
With Conan managing the packman dependencies one just needs to figure out the NVIDIA distribution CDN URL for a specific package, e.g. by using
$ ./tools/packman list carb_sdk -r packman:cloudfront -st
to have a streamlined building experience:
# Make sure you clone this repo with the ov_utils submodule as well
conan_cmake_template$ git clone --recursive git@github.com:learnomniverse/conan_cmake_template.git
conan_cmake_template$ ./ov_utils/deps/install_all_deps.sh # Download and locally install all dependencies via Conan
# Create the CMake build files that will reference Conan dependencies automatically in a _compiler/ directory
conan_cmake_template$ conan install . --output-folder _compiler
conan_cmake_template$ cd _compiler
# Execute CMake configure to generate the final Makefiles. Use the conan-linux-release preset (so that deps
# will be visible) and use the CMakeLists.txt file in the parent '..' folder.
# This will also generate the _build/ folder hierarchy of directories and symlinks.
conan_cmake_template/_compiler$ cmake --preset conan-linux-release ..
# Build the project. This is equivalent to just calling `make`
conan_cmake_template/_compiler$ cmake --build . --config Release
conan_cmake_template/_compiler$ cd ..
# Enjoy your fully-built Kit app based on your omni.hello.world extension!
conan_cmake_template$ $ ./_build/linux-x86_64/release/kit/kit ./_build/linux-x86_64/release/apps/omni.app.kit.dev.kit
# Create a new empty stage from the File menu and observe the console warnings
The most important files to configure your extension repository are:
-
the root
conanfile.py: after pulling and installing NVIDIA CDN-provided dependencies through theov_utils/scripts, this file allows you to specify which dependencies your extension needs and to use theCMakeToolchaingenerator (to let CMake be aware of the Conan toolchain easily via presets) and theCMakeDeps(to let you find them viafind_packagecalls). -
the main
CMakeLists.txtCMake file which lets you create a hierarchical_build/folder structure via easy-to-use utility functionscreate_folder_structure(${CMAKE_CURRENT_SOURCE_DIR}/_build " ${OS_AND_ARCHITECTURE} +-- ${BUILD_CONFIG} | +-- apps -> ${CMAKE_CURRENT_SOURCE_DIR}/apps | +-- exts | | +-- omni.hello.world | | +-- bin | | +-- config -> ${OMNI_HELLO_WORLD_DIR}/config | | +-- data -> ${OMNI_HELLO_WORLD_DIR}/data | | +-- docs -> ${OMNI_HELLO_WORLD_DIR}/docs | | +-- omni | | +-- hello | | +-- world | | +-- bindings | | +-- scripts -> ${OMNI_HELLO_WORLD_DIR}/python/scripts | +-- kit -> ${kit_sdk_PACKAGE_FOLDER_RELEASE} target-deps +-- nv_usd -> ${nv_usd_PACKAGE_FOLDER_RELEASE} +-- carb_sdk -> ${carb_sdk_PACKAGE_FOLDER_RELEASE} +-- pybind11 -> ${pybind11_PACKAGE_FOLDER_RELEASE} +-- python -> ${python_PACKAGE_FOLDER_RELEASE} ")and generate both the native C++ and the pybind11 bindings modules easily.
These two files contain the bare minimum required to have a fully functional OV build experience.
Credits
Created by Marco Alesiani.
![]()
![]()
This book and its webGL frontpage use open source and royalty-free libraries and technologies. Some paragraphs also draw from freely shared material.
A huge thank you to all people who made this possible.